Quantcast
Channel: Geek On Java
Viewing all 322 articles
Browse latest View live

Sweetalert - Beautiful JavaScript Alert

$
0
0
Sweetalert is an awesome replacement for JavaScript's alert. It  is an easy-to-use library that aims to replace JavaScript's existing "alert" and "prompt" features with better-looking versions. In this lesson, we'll go through the basics and common use cases of the library.


Usage

You can install SweetAlert through bower:
bower install sweetalert
Or through npm:
npm install sweetalert
Alternatively, download the package and reference the JavaScript and CSS files manually:
<scriptsrc="dist/sweetalert.min.js"></script>
<linkrel="stylesheet"type="text/css"href="dist/sweetalert.css">
Note: If you're using an older version than v1.0.0, the files are lib/sweet-alert.min.js and lib/sweet-alert.css

View more examples

Examples

The most basic message:
swal("Hello world!");
A message signaling an error:
swal("Oops...", "Something went wrong!", "error");

A warning message, with a function attached to the "Confirm"-button:

swal({
title: "Are you sure?",
text: "You will not be able to recover this imaginary file!",
type: "warning",
showCancelButton: true,
confirmButtonColor: "#DD6B55",
confirmButtonText: "Yes, delete it!",
closeOnConfirm: false,
html: false
}, function(){
swal("Deleted!",
"Your imaginary file has been deleted.",
"success");
});

A prompt modal where the user's input is logged:

swal({
title: "An input!",
text: 'Write something interesting:',
type: 'input',
showCancelButton: true,
closeOnConfirm: false,
animation: "slide-from-top"
}, function(inputValue){
console.log("You wrote", inputValue);
});

Ajax request example:

swal({
title: 'Ajax request example',
text: 'Submit to run ajax request',
type: 'info',
showCancelButton: true,
closeOnConfirm: false,
disableButtonsOnConfirm: true,
confirmLoadingButtonColor: '#DD6B55'
}, function(inputValue){
setTimeout(function() {
swal('Ajax request finished!');
}, 2000);
});

Themes

SweetAlert can easily be themed to fit your site's design. SweetAlert comes with three example themes that you can try out: facebooktwitterand google. They can be referenced right after the intial sweetalert-CSS:
<linkrel="stylesheet"href="dist/sweetalert.css">
<linkrel="stylesheet"href="themes/twitter/twitter.css">

Browser compatibility

SweetAlert works in most major browsers (yes, even IE). Some details:
  • IE8: (Dropped since v1.0.0-beta)
  • IE9: Works, but icons are not animated.
  • IE10+: Works!
  • Safari 4+: Works!
  • Firefox 3+: Works!
  • Chrome 14+: Works!
  • Opera 15+: Works!


Snapchat Clone Source Code For Android and iOS

$
0
0

Moments is a Snapchat clone built using Xamarin.Forms and Microsoft Azure.
Text messaging is out-of-style! Everyone these days sends selfies, pictures of their food, and emojis instead. Duh. Moments allows you to send those selfies and pictures of your food to those that love you. You can even draw funny pictures on them! That's not even the best part! 

But seriously. Moments is awesome! If you've ever wondered how to use custom renderers in Xamarin.Forms, upload blobs from your Xamarin apps using Azure Storage, or how to maximize shared code with Plugins for Xamarin, Moments can show you how.

Screenshots

iOS

ios

Android

android

Build Your Own

Moments uses Microsoft Azure for its back-end. To create host your own Moments app follow the instructions below to:
  • configure Azure Mobile Services,
  • configure Azure Storage,
  • setup Xamarin Insights, and
  • add the required constants to the Keys class in the app

Instructions

1. Get the code

  1. Clone or download Moments using either the command line or GitHub for Windows/Mac client.

2. New Azure Mobile Service (for data)

  1. To power our backend, including our accounts and friends system, we will be using Azure Mobile Services. Create a new Azure Mobile Service - following these instructions - under New > Compute > Mobile Service > Create. Be sure to choose the BACKEND: Javascript option (do not choose the .NET backend).

3. New Azure Storage (for images)

  1. We have to store your selfies somewhere! Create a new Azure Storage account - following these instructions - under New > Data Services > Storage > Quick Create.
  2. Click on the Azure Storage account you just created and create a new container by clicking CONTAINERS from the top menu then ADD from the bottom. Name your container whatever you wish, but make sure to set Access: Public Blob.
  3. Click DASHBOARD from the top menu in the storage account then MANAGE ACCESS KEYS at the bottom. Take note of the "Storage Account Name" and "Primary Access Key" fields - they are required in the next step...

4. Connecting the Storage and Mobile Service

  1. Browse to the Azure Mbile Service created in step 2.1. and click CONFIGURE, then scroll down to the app settings section, and add two new key-value pairs:
    • STORAGE_ACCOUNT_NAME : value from previous step
    • STORAGE_ACCOUNT_ACCESS_KEY : value from previous step
  2. Press SAVE at the bottom to persist the changes.

5. Configuring the Service data backend

  1. Check to see if Git access is enabled by going the mobile service's DASHBOARD. If you look on the right-hand side, you should see something like "Setup source control" OR a "source control user" already showing (if you have already used source control with Azure, you may see "Reset your source control credentials"). Source control must be configured with Azure before you can continue; remember the credentials you create, they arenot the same as your Azure login.
  2. Now go to the CONFIGURE tab for your Azure Mobile Service - you should see a Git URL. Copy this so that you can clone the repository on your Desktop (requries some familiarity with git). The basic steps are:
    • open Terminal or a command line prompt
    • cd Desktop (ie. navigate to the desktop or some other appropriate folder)
    • git clone YOUR_MOBILE_SERVICE_GIT_URL_HERE (will create a folder with the name of your service)
    • You'll be required to enter the Username and Password... this is not your Azure credentials, but the source control username and password you set-up previously.
    • when the cloning is complete, there will a folder with the same name as your Azure Mobile Service, containing another folder called service (with sub-folders like api, extensions, scheduler, shared, table).
  3. Delete the contents of repository (ie. the service folder) you just cloned and copy in the files from theMoments/Azure directory - ensure there is a service folder with all the other directories beneath it.
  4. Return to the command line Terminal
    • navigate to the folder containing the repository of your mobile service, eg cd YOUR_MOBILE_SERVICE_NAME
    • type git add . (the fullstop/point is important) This will allow Git to track all the new files in the directory
    • to commit the new files type git commit
    • type A for insert mode and then type a commit message
    • then press ESC follow by :x to exit the commenting mode if you are using a Mac
    • Type git push
  5. In the Azure Mobile Service go to DATA and then click CREATE at the bottom to add four tables (so repeat four times):
    • Account with all the permissions set to "Anybody with the Application Key"
    • User with "Anybody with the Application Key"
    • Friendship with "Only Authenticated Users"
    • Moment with "Only Authenticated Users"
  6. Go to the Azure Mobile Service DASHBOARD and click MANAGE KEYS at the bottom. Copy the Master Key for the next step.
  7. Return to the DATA section and click the Account table, then click SCRIPT and choose Insert from the drop-down list. Copy the Account_Insert.js code - replacing YOUR_MASTER_KEY_HERE with the value from the previous step. Refer to this blog for more info on how it works. Be sure to click SAVE at the bottom to persist changes to the script.
The backend for your Snapchat clone is now complete. :)

6. Xamarin Insights

  1. We want to track everything that happens within our app, so visit the Xamarin Insights portal, create a new application, and copy/paste the API key for Keys.cs in the next step.

7. Run the Xamarin App (iOS or Android)

  1. Open the solution for Moments and navigate to Helpers/Keys.cs. Paste in relevant keys and information as seen below: Keys.csThese values come from:
    • ApplicationURL - Azure Mobile Services DASHBOARD > MOBILE SERVICE URL
    • ApplicationMobileService - Azure Mobile Services DASHBOARD > MOBILE SERVICE URL
    • ApplicationKey - Azure Mobile Services DASHBOARD > MANAGE KEYS > APPLICATION KEY
    • ContainerURL - Azure Storage CONTAINERS page NAME column
    • ContainerName - Azure Storage CONTAINERS page URL column
    • InsightsKey - Xamarin Insights configuration (using this is optional)
  2. Build Moments for either an iOS or Android device, and watch it work its magic!

Android Glide Image Library

$
0
0
Glide is a fast and efficient open source media management and image loading framework for Android that wraps media decoding, memory and disk caching, and resource pooling into a simple and easy to use interface.

Glide supports fetching, decoding, and displaying video stills, images, and animated GIFs. Glide includes a flexible API that allows developers to plug in to almost any network stack. By default Glide uses a custom HttpUrlConnection based stack, but also includes utility libraries plug in to Google's Volley project or Square's OkHttp library instead.
Glide's primary focus is on making scrolling any kind of a list of images as smooth and fast as possible, but Glide is also effective for almost any case where you need to fetch, resize, and display a remote image.

Download

You can download a jar from GitHub's releases page.

Or use Gradle:

repositories {
mavenCentral() // jcenter() works as well because it pulls from Maven Central
}

dependencies {
compile 'com.github.bumptech.glide:glide:3.7.0'
compile 'com.android.support:support-v4:19.1.0'
}

Or Maven:

<dependency>
<groupId>com.github.bumptech.glide</groupId>
<artifactId>glide</artifactId>
<version>3.7.0</version>
</dependency>
<dependency>
<groupId>com.google.android</groupId>
<artifactId>support-v4</artifactId>
<version>r7</version>
</dependency>

Proguard

Depending on your proguard config and usage, you may need to include the following lines in your proguard.cfg:
-keep public class * implements com.bumptech.glide.module.GlideModule
-keep public enum com.bumptech.glide.load.resource.bitmap.ImageHeaderParser$** {
**[] $VALUES;
public *;
}

How do I use Glide?

Simple use cases will look something like this:
// For a simple view:
@Overridepublicvoid onCreate(Bundle savedInstanceState) {
...
ImageView imageView = (ImageView) findViewById(R.id.my_image_view);

Glide.with(this).load("http://goo.gl/gEgYUd").into(imageView);
}

// For a simple image list:
@OverridepublicView getView(int position, View recycled, ViewGroup container) {
finalImageView myImageView;
if (recycled ==null) {
myImageView = (ImageView) inflater.inflate(R.layout.my_image_view, container, false);
} else {
myImageView = (ImageView) recycled;
}

String url = myUrls.get(position);

Glide
.with(myFragment)
.load(url)
.centerCrop()
.placeholder(R.drawable.loading_spinner)
.crossFade()
.into(myImageView);

return myImageView;
}

Compatibility

  • Android SDK: Glide requires a minimum API level of 10.
  • OkHttp 2.x: there are optional dependencies available called okhttp-integration, see Integration Libraries wiki page.
  • OkHttp 3.x: there are optional dependencies available called okhttp3-integration, see Integration Libraries wiki page.
  • Volley: there are optional dependencies available called volley-integration, see Integration Libraries wiki page.
  • Round PicturesCircleImageView/CircularImageView/RoundedImageView are known to have issues withTransitionDrawable (.crossFade() with .thumbnail() or .placeholder()) and animated GIFs, use aBitmapTransformation (.circleCrop() will be available in v4) or .dontAnimate() to fix the issue.
  • Huge Images (maps, comic strips): Glide can load huge images by downsampling them, but does not support zooming and panning ImageViews as they require special resource optimizations (such as tiling) to work withoutOutOfMemoryErrors.

Build

Building Glide with gradle is fairly straight forward:
git clone git@github.com:bumptech/glide.git # use https://github.com/bumptech/glide.git if "Permission Denied"
cd glide
git submodule init && git submodule update
./gradlew jar
Note: Make sure your Android SDK has the Android Support Repository installed, and that your $ANDROID_HOME environment variable is pointing at the SDK or add a local.properties file in the root project with a sdk.dir=... line.

Samples

Follow the steps in the Build section to setup the project and then:
./gradlew :samples:flickr:run
./gradlew :samples:giphy:run
./gradlew :samples:svg:run
You may also find precompiled APKs on the releases page.

Development

Follow the steps in the Build section to setup the project and then edit the files however you wish. Intellij IDEA 14 cleanly imports both Glide's source and tests and is the recommended way to work with Glide.
To open the project in IntelliJ IDEA:
  1. Go to File menu or the Welcome Screen
  2. Click on Open...
  3. Navigate to Glide's root directory.
  4. Select build.gradle

Android Glide Image Library Tutorial

$
0
0
Android Glide Image Library


Glide is a fast and efficient open source media management and image loading framework for Android that wraps media decoding, memory and disk caching, and resource pooling into a simple and easy to use interface.

Top 3 Modern Way to Hack Email Account

$
0
0
In terms of recent ways in which of email hacking, there are unfortunately many prospects you wish to be aware of. If you're a security enthusiast, It will truly be pretty encouraging for you to understand that there are so many other ways to work with. If you've got scan my earlier post on however email hacking works, you may have a transparent image of however mental object of hacking ways will compromise your account.


When it involves modern hacking methods, there are variety of different stuff you will think about. However, the actual ways of hacking email (phishing, keylogging, etc) stay same as mentioned within the previous post and to be ready to truly perform those ways, A Hacker might use alternative social engineering ways or ways and we are discussing those in this post.

An email account is that the gateway into your personal life that, sadly, means that it’s additionally a valuable target for hackers to hack into your personal life. As they say, the biggest computer hacks of all time started with compromised email account.

Top 3 modern ways to email hacking

Malware in general seems like something that's obtaining smarter all the time. once you break down the modern ways in which of hacking, you’re going to realize that several of them return all the way down to insidious, clever ways for obtaining malware into systems. Email hacking is one chance, to be sure, however it’s not the only choice on the market to you by a long shot.

Each year, Security researchers come across new techniques used by hackers that raise eyebrows. but all of them revolve around recent social engineering techniques. Here are a number of the modern attacks, a hacker might use to gather your data and private details to hack into your system or email.

Setting-up fake wireless access points (Free WiFi)

This is one that may trip up even the neatest users. making a fake WAP or free WLAN is entirely too simple for anyone during this day and age. And who doesn’t crave for free WiFi?, we all use these free access points all the time whenever we get one, however we should always really try and be more careful.

Once we are connected to such a point, it’s pretty easy for hackers to swoop in and take what they like over HTTP. the concept for the hacker is to line up associate access point that sounds legitimate. people connect, and every one of that unprotected information is there for the taking.


You would say most websites you use are encrypted (HTTPS enabled), thus no way hackers will intercept the information you're sending in and receiving. Yes true, however hackers are continually one step ahead.

Along with monitoring your HTTP traffic, The a lot of devious hacker can raise their victims to make a new access account to use their ‘Free WiFi‘. Most users can probably use a standard username or one in every of their email addresses, along with a common password they used elsewhere.

The “Free WiFi” hacker will then try using the victims credentials on popular email suppliers like Gmail or Yahoo-mail and obtain management of his/her email account and also the victim can never know how it happened.

This doesn’t stop here, the hacker will even push malware into your system whereas you're making associate account for using free WLAN, getting your whole computer or phone compromised or steal your cookie to access you approved account session.

Bait and switch Hacking – used for phishing & malware spread

This is the most well liked current techniques employed by hackers to put in malware on to your system or perform phishing attack to hack into your email account.

Ever noticed whereas you're at any transfer page especially once downloading pirated movies or songs, along side the legit transfer button you may realize number of a lot of transfer buttons on the same page or generally you may be presented with popups claiming fake system errors on your laptop. These are literally advertisements or in this case a bait-and switch attack carried out by hackers.

The hacker first buys a advertising slot on download websites by showing legitimate or harmless content/Advertisement. The download website approves the advertisement and takes the payment. The hacker then switches the content or advertisement with one thing significantly a lot of malicious. typically they're going to code the advertisement with JavaScript to direct viewers to a different web site that is supposed for phishing attack for hacking email or force users to download malware disguised as legit download item.

You think you're downloading/running safe, so suddenly, this can be no longer the case. Following the link to download one thing you would like, you may begin by downloading random software’s.

This complicates fast detection and take-down of the advertisement since the hacker first baits for legit advertisement so switches it with malicious code while not the download website’s consent and notice.

The waterhole attack – Hacking company email accounts

As the name implies, this can be the practice of poisoning a physical or virtual location that lots of individuals utilize, sometimes people from same organization or group. the advantages of doing so are huge to hackers. a good example of this may be a coffeehouse or a eating place that lots of staff from a specific Company hang around. A fake WAP or “Free WiFi” is created to grab personal data from these staff and gain access to the network at the target’s place.


Usually Email service or client employed by firms are all unencrypted i.e all staff access their email accounts over normal HTTP connection in contrast to popular email services like Gmail who use encrypted HTTPS protocol, leaving all the online traffic simply intercept-able and simple email hacking.

Companies like Facebook and Apple are hit by these forms of attacks within the past. primarily, any popular meeting place goes to prove to be a potential target for a hacker.

Final word

Never trust public WLAN Access points and if at all you've got to use it, then confirm you're accessing only HTTPS version of the website or use any VPN service that protects all of your communications.

Never recycle your passwords. always use totally different word for various websites, primarily Passphrase instead of word.

Make Animated Icons Using Javascript with mo.js

$
0
0
Mo.js, a really powerful motion graphics library for the web created by Oleg Solomka. you'll be able to do plenty of amazing things with it and these days we’d prefer to share our take on some icon animations using the library.


It would be extremely nice to be ready to animate icons simply to appear like Twitter’s heart animation, and once seeing this Dribbble shot by Daryl Ginn of a hybrid (this is “what Twitter’s like animation would seem like if it were on Facebook”), we needed to do to use mo.js together with Dave Gandy’s Font awesome web font and see what is done.


The icons that we are animating are actions wherever it makes sense to own an active state, like as an example the “favorite”, “like” or “upvote”. Although, theoretically, you may apply these quite effects to something, it extremely feels additional smart for these quite actions.

Download Source Code


Demo: You can check here also


Let’s have a glance at an example. therefore we’ve used Font awesome as icon font and include it in a button like this:

<buttonclass="icobutton icobutton--thumbs-up">
<spanclass="fa fa-thumbs-up"></span>
</button>
The designs include some resets and size definitions for the button.

You can currently define your animations as follows:

    var scaleCurve = mojs.easing.path('M0,100 L25,99.9999983 C26.2328835,75.0708847 19.7847843,0 100,0');
var el = document.querySelector('.icobutton'),
elSpan = el.querySelector('span'),
// mo.js timeline obj
timeline = new mojs.Timeline(),

// tweens for the animation:

// burst animation
tween1 = new mojs.Burst({
parent: el,
duration: 1500,
shape : 'circle',
fill : ['#988ADE', '#DE8AA0', '#8AAEDE', '#8ADEAD', '#DEC58A', '#8AD1DE'],
x: '50%',
y: '50%',
opacity: 0.6,
childOptions: { radius: {20:0} },
radius: {40:120},
count: 6,
isSwirl: true,
isRunLess: true,
easing: mojs.easing.bezier(0.1, 1, 0.3, 1)
}),
// ring animation
tween2 = new mojs.Transit({
parent: el,
duration: 750,
type: 'circle',
radius: {0: 50},
fill: 'transparent',
stroke: '#988ADE',
strokeWidth: {15:0},
opacity: 0.6,
x: '50%',
y: '50%',
isRunLess: true,
easing: mojs.easing.bezier(0, 1, 0.5, 1)
}),
// icon scale animation
tween3 = new mojs.Tween({
duration : 900,
onUpdate: function(progress) {
var scaleProgress = scaleCurve(progress);
elSpan.style.WebkitTransform = elSpan.style.transform = 'scale3d(' + scaleProgress + ',' + scaleProgress + ',1)';
}
});

// add tweens to timeline:
timeline.add(tween1, tween2, tween3);

// when clicking the button start the timeline/animation:
el.addEventListener('mouseenter', function() {
timeline.start();
});
Note that we are using a fixed size for the effects here. For a additional flexible approach, you may define the sizes dynamically.
Okay, now try your own animations; the probabilities are endless!
We hope you enjoyed these animations and notice them inspiring!

Use Google Places Autocomplete API in Android Search Dialog

$
0
0
In this article, we are going to develop an android application with a search panel.

The search panel permits users to search various places using Google Places API and shows the result as a marker within the Google Maps android API V2.

Use Google Places Autocomplete API, in Android Search Dialog


We additionally add custom suggestions to search Dialog with Google Places Autocomplete api.

You can check : Google Maps V2 Android Tutorial

Major files used in this application are listed below :

  1. MainActivity.java : This is the only activity that the application contains and search is invoked from this activity using options menu.
  2. searchable.xml : This is the configuration file for search dialog which defines content provider and suggestion properties.
  3. PlaceProvider.java : The content provider for fetching places from Google places autocomplete API.
  4. PlaceJSONParser.java : Parses the result of Google Places Autocomplete API.
  5. PlaceDetailsJSONParser.java : Parses the result of Google Places Details API.

Download Source Code

This application is developed in Eclipse (4.2.1) with ADT plugin (22.0.1) and Android SDK (22.0.1) and tested in real devices with Android versions 2.3.6  ( GingerBread ) and 4.1.2 ( Jelly Bean ).

Screenshot 1

Screenshot 2

Screenshot 3


Screenshot 4


1. Create new Android application project with the given below details


  • Application Name : LocationSearchDialogV2
  • Project Name : LocationSearchDialogV2
  • Package Name : com.blogspot.geekonjava
  • Minimum Required SDK : API 8 : Android 2.2 ( Froyo )
  • Target SDK : API 17 : Android 4.2 ( Jelly Bean )

2. Download and configure Google Play Services Library in Eclipse

Please follow the given below link to setup Google Play Service library in Eclipse.
http://developer.android.com/google/play-services/setup.html

3. Referencing the Google Play Services library in this project

Please follow the given below link to reference the Google Play Service library into this project
http://developer.android.com/tools/projects/projects-eclipse.html#ReferencingLibraryProject

4. Get the API key for Google Maps Android API V2

We need to get an API key from Google to use Google Maps in Android application.
Please follow the given below link to get the API key for Google Maps Android API v2.
https://developers.google.com/maps/documentation/android/start

5. Get the API key for Google Places API

We can create API key for Google Place API by clicking “Create new Browser key”  available at the “API Access” pane of the Google console URL : http://code.google.com/apis/console.

Also ensure that, “Places API” is enabled in the “Services” pane of the Google console.

6. Add Android Support library to this project

By default, Android support library (android-support-v4.jar ) is added to this project by Eclipse IDE to the directory libs. If it is not added, we can do it manually by doing the following steps :

  • Open Project Explorer by Clicking “Window -> Show View -> Project Explorer”
  • Right click this project
  • Then from popup menu, Click “Android Tools -> Add Support Library “

7. Update the file res/values/strings.xml

<?xml version="1.0" encoding="utf-8"?>
<resources>

<stringname="app_name">LocationSearchDialogV2</string>
<stringname="action_search">Search</string>
<stringname="hello_world">Hello world!</string>
<stringname="search_hint">Search Places</string>
<stringname="search_settings">Search Places</string>

</resources>

8. Update the layout file res/layout/activity_main.xml

<RelativeLayoutxmlns:android="http://schemas.android.com/apk/res/android"
xmlns:tools="http://schemas.android.com/tools"
android:layout_width="match_parent"
android:layout_height="match_parent"
android:paddingBottom="@dimen/activity_vertical_margin"
android:paddingLeft="@dimen/activity_horizontal_margin"
android:paddingRight="@dimen/activity_horizontal_margin"
android:paddingTop="@dimen/activity_vertical_margin"
tools:context=".MainActivity">

<fragment
android:id="@+id/map"
android:layout_width="wrap_content"
android:layout_height="wrap_content"
class="com.google.android.gms.maps.SupportMapFragment"/>

</RelativeLayout>

9. Update the menu file res/menu/main.xml

<menuxmlns:android="http://schemas.android.com/apk/res/android">

<item
android:id="@+id/action_search"
android:orderInCategory="100"
android:showAsAction="never"
android:title="@string/action_search"/>

</menu>

10. Create the class file src/com/blogspot/geekonjava/PlaceJSONParser.java

package com.blogspot.geekonjava;

importjava.util.ArrayList;
importjava.util.HashMap;
importjava.util.List;

importorg.json.JSONArray;
importorg.json.JSONException;
importorg.json.JSONObject;

publicclassPlaceJSONParser {

/** Receives a JSONObject and returns a list */
public List<HashMap<String,String>> parse(JSONObject jObject){

JSONArray jPlaces = null;
try {
/** Retrieves all the elements in the 'places' array */
jPlaces = jObject.getJSONArray("predictions");
} catch (JSONException e) {
e.printStackTrace();
}
/** Invoking getPlaces with the array of json object
* where each json object represent a place
*/
returngetPlaces(jPlaces);
}

private List<HashMap<String, String>> getPlaces(JSONArray jPlaces){
int placesCount = jPlaces.length();
List<HashMap<String, String>> placesList = new ArrayList<HashMap<String,String>>();
HashMap<String, String> place = null;

/** Taking each place, parses and adds to list object */
for(int i=0; i<placesCount;i++){
try {
/** Call getPlace with place JSON object to parse the place */
place = getPlace((JSONObject)jPlaces.get(i));
placesList.add(place);

} catch (JSONException e) {
e.printStackTrace();
}
}

return placesList;
}

/** Parsing the Place JSON object */
private HashMap<String, String> getPlace(JSONObject jPlace){

HashMap<String, String> place = new HashMap<String, String>();

String id="";
String reference="";
String description="";

try {

description = jPlace.getString("description");
id = jPlace.getString("id");
reference = jPlace.getString("reference");

place.put("description", description);
place.put("_id",id);
place.put("reference",reference);

} catch (JSONException e) {
e.printStackTrace();
}
return place;
}
}

11. Create the class file src/com/blogspot/geekonjava/PlaceDetailsJSONParser.java

package com.blogspot.geekonjava;

importjava.util.ArrayList;
importjava.util.HashMap;
importjava.util.List;

importorg.json.JSONException;
importorg.json.JSONObject;

publicclassPlaceDetailsJSONParser {

/** Receives a JSONObject and returns a list */
public List<HashMap<String,String>> parse(JSONObject jObject){

Double lat = Double.valueOf(0);
Double lng = Double.valueOf(0);
String formattedAddress = "";

HashMap<String, String> hm = new HashMap<String, String>();
List<HashMap<String, String>> list = new ArrayList<HashMap<String,String>>();

try {
lat = (Double)jObject.getJSONObject("result").getJSONObject("geometry").getJSONObject("location").get("lat");
lng = (Double)jObject.getJSONObject("result").getJSONObject("geometry").getJSONObject("location").get("lng");
formattedAddress = (String) jObject.getJSONObject("result").get("formatted_address");

} catch (JSONException e) {
e.printStackTrace();
}catch(Exception e){
e.printStackTrace();
}

hm.put("lat", Double.toString(lat));
hm.put("lng", Double.toString(lng));
hm.put("formatted_address",formattedAddress);

list.add(hm);

return list;
}
}

12. Create the file src/com/blogspot/geekonjava/PlaceProvider.java

package com.blogspot.geekonjava;

importjava.io.BufferedReader;
importjava.io.IOException;
importjava.io.InputStream;
importjava.io.InputStreamReader;
importjava.io.UnsupportedEncodingException;
importjava.net.HttpURLConnection;
importjava.net.URL;
importjava.net.URLEncoder;
importjava.util.HashMap;
importjava.util.List;

importorg.json.JSONException;
importorg.json.JSONObject;

importandroid.app.SearchManager;
importandroid.content.ContentProvider;
importandroid.content.ContentValues;
importandroid.content.UriMatcher;
importandroid.database.Cursor;
importandroid.database.MatrixCursor;
importandroid.net.Uri;
importandroid.util.Log;

publicclassPlaceProviderextends ContentProvider {

publicstaticfinal String AUTHORITY = "com.blogspot.geekonjava.PlaceProvider";

publicstaticfinal Uri SEARCH_URI = Uri.parse("content://"+AUTHORITY+"/search");

publicstaticfinal Uri DETAILS_URI = Uri.parse("content://"+AUTHORITY+"/details");

privatestaticfinalint SEARCH = 1;
privatestaticfinalint SUGGESTIONS = 2;
privatestaticfinalint DETAILS = 3;

// Obtain browser key from https://code.google.com/apis/console
String mKey = "key=YOUR_BROWSER_KEY";

// Defines a set of uris allowed with this content provider
privatestaticfinal UriMatcher mUriMatcher = buildUriMatcher();

privatestatic UriMatcher buildUriMatcher() {

UriMatcher uriMatcher = new UriMatcher(UriMatcher.NO_MATCH);

// URI for "Go" button
uriMatcher.addURI(AUTHORITY, "search", SEARCH );

// URI for suggestions in Search Dialog
uriMatcher.addURI(AUTHORITY, SearchManager.SUGGEST_URI_PATH_QUERY,SUGGESTIONS);

// URI for Details
uriMatcher.addURI(AUTHORITY, "details",DETAILS);

return uriMatcher;
}

@Override
public Cursor query(Uri uri, String[] projection, String selection,
String[] selectionArgs, String sortOrder) {
Cursor c = null;

PlaceJSONParser parser = new PlaceJSONParser();
PlaceDetailsJSONParser detailsParser = new PlaceDetailsJSONParser();

String jsonString = "";
String jsonPlaceDetails = "";

List<HashMap<String, String>> list = null;
List<HashMap<String, String>> detailsList = null;

MatrixCursor mCursor = null;

switch(mUriMatcher.match(uri)){
caseSEARCH:
// Defining a cursor object with columns description, lat and lng
mCursor = new MatrixCursor(new String[] { "description","lat","lng" });

// Create a parser object to parse places in JSON format
parser = new PlaceJSONParser();

// Create a parser object to parse place details in JSON format
detailsParser = new PlaceDetailsJSONParser();

// Get Places from Google Places API
jsonString = getPlaces(selectionArgs);
try {
// Parse the places ( JSON => List )
list = parser.parse(new JSONObject(jsonString));

// Finding latitude and longitude for each places using Google Places Details API
for(int i=0;i<list.size();i++){
HashMap<String, String> hMap = (HashMap<String, String>) list.get(i);

detailsParser =new PlaceDetailsJSONParser();

// Get Place details
jsonPlaceDetails = getPlaceDetails(hMap.get("reference"));

// Parse the details ( JSON => List )
detailsList = detailsParser.parse(new JSONObject(jsonPlaceDetails));

// Creating cursor object with places
for(int j=0;j<detailsList.size();j++){
HashMap<String, String> hMapDetails = detailsList.get(j);

// Adding place details to cursor
mCursor.addRow(new String[]{ hMap.get("description") , hMapDetails.get("lat") , hMapDetails.get("lng") });
}

}
} catch (JSONException e) {
// TODO Auto-generated catch block
e.printStackTrace();
}
c = mCursor;
break;

case SUGGESTIONS :

// Defining a cursor object with columns id, SUGGEST_COLUMN_TEXT_1, SUGGEST_COLUMN_INTENT_EXTRA_DATA
mCursor = new MatrixCursor(new String[] { "_id", SearchManager.SUGGEST_COLUMN_TEXT_1, SearchManager.SUGGEST_COLUMN_INTENT_EXTRA_DATA } );

// Creating a parser object to parse places in JSON format
parser = new PlaceJSONParser();

// Get Places from Google Places API
jsonString = getPlaces(selectionArgs);

try {
// Parse the places ( JSON => List )
list = parser.parse(new JSONObject(jsonString));

// Creating cursor object with places
for(int i=0;i<list.size();i++){
HashMap<String, String> hMap = (HashMap<String, String>) list.get(i);

// Adding place details to cursor
mCursor.addRow(new String[] { Integer.toString(i), hMap.get("description"), hMap.get("reference") });
}
} catch (JSONException e) {
// TODO Auto-generated catch block
e.printStackTrace();
}
c = mCursor;
break;

case DETAILS :
// Defining a cursor object with columns description, lat and lng
mCursor = new MatrixCursor(new String[] { "description","lat","lng" });

detailsParser = new PlaceDetailsJSONParser();
jsonPlaceDetails = getPlaceDetails(selectionArgs[0]);
try {
detailsList = detailsParser.parse(new JSONObject(jsonPlaceDetails));
} catch (JSONException e) {
// TODO Auto-generated catch block
e.printStackTrace();
}

for(int j=0;j<detailsList.size();j++){
HashMap<String, String> hMapDetails = detailsList.get(j);
mCursor.addRow(new String[]{ hMapDetails.get("formatted_address") , hMapDetails.get("lat") , hMapDetails.get("lng") });
}
c = mCursor;
break;
}
return c;
}

@Override
publicintdelete(Uri uri, String selection, String[] selectionArgs) {
// TODO Auto-generated method stub
return0;
}

@Override
public String getType(Uri uri) {
// TODO Auto-generated method stub
returnnull;
}

@Override
public Uri insert(Uri uri, ContentValues values) {
// TODO Auto-generated method stub
returnnull;
}

@Override
publicbooleanonCreate() {
// TODO Auto-generated method stub
returnfalse;
}

@Override
publicintupdate(Uri uri, ContentValues values, String selection,
String[] selectionArgs) {
// TODO Auto-generated method stub
return0;
}

/** A method to download json data from url */
private String downloadUrl(String strUrl) throws IOException{
String data = "";
InputStream iStream = null;
HttpURLConnection urlConnection = null;
try{
URL url = new URL(strUrl);

// Creating an http connection to communicate with url
urlConnection = (HttpURLConnection) url.openConnection();

// Connecting to url
urlConnection.connect();

// Reading data from url
iStream = urlConnection.getInputStream();

BufferedReader br = new BufferedReader(new InputStreamReader(iStream));

StringBuffer sb = new StringBuffer();

String line = "";
while( ( line = br.readLine()) != null){
sb.append(line);
}

data = sb.toString();

br.close();

}catch(Exception e){
Log.d("Exception while downloading url", e.toString());
}finally{
iStream.close();
urlConnection.disconnect();
}
return data;
}

private String getPlaceDetailsUrl(String ref){

// reference of place
String reference = "reference="+ref;

// Sensor enabled
String sensor = "sensor=false";

// Building the parameters to the web service
String parameters = reference+"&"+sensor+"&"+mKey;

// Output format
String output = "json";

// Building the url to the web service
String url = "https://maps.googleapis.com/maps/api/place/details/"+output+"?"+parameters;

return url;
}

private String getPlacesUrl(String qry){

try {
qry = "input=" + URLEncoder.encode(qry, "utf-8");
} catch (UnsupportedEncodingException e1) {
e1.printStackTrace();
}

// Sensor enabled
String sensor = "sensor=false";

// place type to be searched
String types = "types=geocode";

// Building the parameters to the web service
String parameters = qry+"&"+types+"&"+sensor+"&"+mKey;

// Output format
String output = "json";
// Building the url to the web service
String url = "https://maps.googleapis.com/maps/api/place/autocomplete/"+output+"?"+parameters;
return url;
}

private String getPlaces(String[] params){
// For storing data from web service
String data = "";
String url = getPlacesUrl(params[0]);
try{
// Fetching the data from web service in background
data = downloadUrl(url);
}catch(Exception e){
Log.d("Background Task",e.toString());
}
return data;
}

private String getPlaceDetails(String reference){
String data = "";
String url = getPlaceDetailsUrl(reference);
try {
data = downloadUrl(url);
} catch (IOException e) {
e.printStackTrace();
}
return data;
}
}
Note : Update “YOUR_BROWSER_KEY" on line 39 with the browser key obtained in Step 5.

Latest library : Java Google Trends API

13. Update the class MainActivity in the file src/com/blogspot/geekonjava/MainActivity.java

package com.blogspot.geekonjava;

importandroid.app.SearchManager;
importandroid.content.Intent;
importandroid.database.Cursor;
importandroid.os.Bundle;
importandroid.support.v4.app.FragmentActivity;
importandroid.support.v4.app.LoaderManager.LoaderCallbacks;
importandroid.support.v4.content.CursorLoader;
importandroid.support.v4.content.Loader;
importandroid.view.Menu;
importandroid.view.MenuItem;

importcom.google.android.gms.maps.CameraUpdate;
importcom.google.android.gms.maps.CameraUpdateFactory;
importcom.google.android.gms.maps.GoogleMap;
importcom.google.android.gms.maps.SupportMapFragment;
importcom.google.android.gms.maps.model.LatLng;
importcom.google.android.gms.maps.model.MarkerOptions;

publicclassMainActivityextends FragmentActivity implements LoaderCallbacks<Cursor>{

GoogleMap mGoogleMap;

@Override
protectedvoidonCreate(Bundle savedInstanceState) {
super.onCreate(savedInstanceState);
setContentView(R.layout.activity_main);

SupportMapFragment fragment = (SupportMapFragment) getSupportFragmentManager().findFragmentById(R.id.map);
mGoogleMap = fragment.getMap();

handleIntent(getIntent());

}

privatevoidhandleIntent(Intent intent){
if(intent.getAction().equals(Intent.ACTION_SEARCH)){
doSearch(intent.getStringExtra(SearchManager.QUERY));
}elseif(intent.getAction().equals(Intent.ACTION_VIEW)){
getPlace(intent.getStringExtra(SearchManager.EXTRA_DATA_KEY));
}
}

@Override
protectedvoidonNewIntent(Intent intent) {
super.onNewIntent(intent);
setIntent(intent);
handleIntent(intent);
}

privatevoiddoSearch(String query){
Bundle data = new Bundle();
data.putString("query", query);
getSupportLoaderManager().restartLoader(0, data, this);
}

privatevoidgetPlace(String query){
Bundle data = new Bundle();
data.putString("query", query);
getSupportLoaderManager().restartLoader(1, data, this);
}

@Override
publicbooleanonCreateOptionsMenu(Menu menu) {
// Inflate the menu
getMenuInflater().inflate(R.menu.main, menu);
returntrue;
}

@Override
publicbooleanonMenuItemSelected(int featureId, MenuItem item) {
switch(item.getItemId()){
case R.id.action_search:
onSearchRequested();
break;
}
returnsuper.onMenuItemSelected(featureId, item);
}

@Override
public Loader<Cursor> onCreateLoader(int arg0, Bundle query) {
CursorLoader cLoader = null;
if(arg0==0)
cLoader = new CursorLoader(getBaseContext(), PlaceProvider.SEARCH_URI, null, null, new String[]{ query.getString("query") }, null);
elseif(arg0==1)
cLoader = new CursorLoader(getBaseContext(), PlaceProvider.DETAILS_URI, null, null, new String[]{ query.getString("query") }, null);
return cLoader;
}

@Override
publicvoidonLoadFinished(Loader<Cursor> arg0, Cursor c) {
showLocations(c);
}

@Override
publicvoidonLoaderReset(Loader<Cursor> arg0) {
// TODO Auto-generated method stub
}

privatevoidshowLocations(Cursor c){
MarkerOptions markerOptions = null;
LatLng position = null;
mGoogleMap.clear();
while(c.moveToNext()){
markerOptions = new MarkerOptions();
position = new LatLng(Double.parseDouble(c.getString(1)),Double.parseDouble(c.getString(2)));
markerOptions.position(position);
markerOptions.title(c.getString(0));
mGoogleMap.addMarker(markerOptions);
}
if(position!=null){
CameraUpdate cameraPosition = CameraUpdateFactory.newLatLng(position);
mGoogleMap.animateCamera(cameraPosition);
}
}
}

14. Update the configuration file /res/xml/searchable.xml

<?xml version="1.0" encoding="utf-8"?>
<searchablexmlns:android="http://schemas.android.com/apk/res/android"
android:label="@string/app_name"
android:hint="@string/search_hint"
android:searchSettingsDescription="@string/search_settings"

android:searchSuggestAuthority="com.blogspot.geekonjava.PlaceProvider"
android:searchSuggestIntentAction="android.intent.action.VIEW"
android:searchSuggestSelection=" ?"
android:searchSuggestThreshold="2">

</searchable>

15. Update the file AndroidManifest.xml

<?xml version="1.0" encoding="utf-8"?>
<manifestxmlns:android="http://schemas.android.com/apk/res/android"
package="com.blogspot.geekonjava"
android:versionCode="1"
android:versionName="1.0">

<uses-sdk
android:minSdkVersion="8"
android:targetSdkVersion="17"/>

<!-- Protect the map component of the application using application signature -->
<permission
android:name="com.blogspot.geekonjava.permission.MAPS_RECEIVE"
android:protectionLevel="signature"/>

<!-- Allows to receive map -->
<uses-permissionandroid:name="com.blogspot.geekonjava.permission.MAPS_RECEIVE"/>

<!-- Used by the Google Maps Android API V2 to download map tiles from Google Maps servers -->
<uses-permissionandroid:name="android.permission.INTERNET"/>

<!-- Allows the Google Maps Android API V2 to cache map tile data in the device's external storage area -->
<uses-permissionandroid:name="android.permission.WRITE_EXTERNAL_STORAGE"/>

<!-- Allows the Google Maps Android API V2 to use WiFi or mobile cell data (or both) to determine the device's location -->
<uses-permissionandroid:name="android.permission.ACCESS_COARSE_LOCATION"/>

<!-- Allows the Google Maps Android API V2 to use the Global Positioning System (GPS)
to determine the device's location to within a very small area -->
<uses-permissionandroid:name="android.permission.ACCESS_FINE_LOCATION"/>

<!-- Allows to contact Google Serves -->
<uses-permissionandroid:name="com.google.android.providers.gsf.permission.READ_GSERVICES"/>

<!-- Google Maps Android API V2 requires OpenGL ES version 2 -->
<uses-feature
android:glEsVersion="0x00020000"
android:required="true"/>

<application
android:allowBackup="true"
android:icon="@drawable/ic_launcher"
android:label="@string/app_name"
android:theme="@style/AppTheme">
<activity
android:name="com.blogspot.geekonjava.MainActivity"
android:label="@string/app_name"
android:launchMode="singleTop">

<intent-filter>
<actionandroid:name="android.intent.action.MAIN"/>
<categoryandroid:name="android.intent.category.LAUNCHER"/>
</intent-filter>

<intent-filter>
<actionandroid:name="android.intent.action.SEARCH"/>
</intent-filter>

<!-- Points to searchable activity -->
<meta-dataandroid:name="android.app.default_searchable"
android:value=".MainActivity"/>

<!-- Points to searchable meta data -->
<meta-dataandroid:name="android.app.searchable"
android:resource="@xml/searchable"/>

</activity>

<provider
android:name=".PlaceProvider"
android:authorities="com.blogspot.geekonjava.PlaceProvider"
android:exported="false"/>

<!-- Specifies the Android API Key, which is obtained from Google API Console -->
<meta-dataandroid:name="com.google.android.maps.v2.API_KEY"
android:value="YOUR_ANDROID_API_KEY"/>
</application>
</manifest>
Note : Update “YOUR_ANDROID_API_KEY" on line 76 with the android key obtained in Step 4.


Material Design Textfield in Android

$
0
0
Are you bored with simple Android design and want some attractive look for your Android apps. Then you need to tends towards Material design which give you power to design your app easily by their pre-build library.
I am telling you about material design texfield for Android UI which is one of the best library of Material design.


It is a different beautiful Floating Edit Text

How to Use

Surround your EditText by a MaterialTextField
<com.github.florent37.materialtextfield.MaterialTextField
android:layout_width="300dp"
android:layout_height="wrap_content"
app:mtf_image="@drawable/ic_mail_grey600_24dp"
>

<EditText
android:layout_width="match_parent"
android:layout_height="wrap_content"
android:hint="Password"
android:textColor="#333"
android:textColorHint="#666"
android:textSize="15sp"/>

</com.github.florent37.materialtextfield.MaterialTextField>

Don't forget to precise a drawable to mtf_image

app:mtf_image="@drawable/ic_mail_grey600_24dp"

Available attributes

<com.github.florent37.materialtextfield.MaterialTextField
android:layout_width="match_parent"
android:layout_height="wrap_content"

app:mtf_cardCollapsedHeight="4dp"
app:mtf_image="@drawable/ic_mail_grey600_24dp"
app:mtf_animationDuration="1000"
app:mtf_labelColor="@android:color/holo_red_dark"
app:mtf_openKeyboardOnFocus="true">

Download from here


Yahoo acquired by Verizon in $128 billion

$
0
0
After months of speculations, negotiations, and rounds of meetings, finally Yahoo! is sold. According to WSJ, citing person familiar with the matter, Verizon acquires Yahoo! for $4.8 billion.


The board of Yahoo! has also accepted the terms and conditions of the Verizon offer, ending the much-talked auction process for the Internet major that rocked the market once.

VERIZON ACQUIRES YAHOO!: THE DEAL

While the deal might have brought a sign of relief for many, it is a remarkable fall of Yahoo!, which was valued $128 billion once. The exact terms and conditions are yet to be known, though, the deal includes Yahoo’s core internet business along with some real estate. However, the patents are not a part of the deal.

This is the second major acquisition in the tech industry in the last two months. In a sudden move last month Microsoft had acquired LinkedIn. The rumors mills, however, were already buzzing the internet about Verizon-Yahoo! deal for some time.

WHAT WAS YAHOO! PUT UNDER HAMMER

If you are following the topic at least for the last few months on Dazeinfo, then you must know the answer to this billion dollar question. It was none other than Yahoo’s current CEO, Marissa Mayer, failed to turn the tides for Yahoo! and finally bowed to the mounting pressure from stakeholders and the board.

The much-hyped MaVeNs strategy, designed and defined by Marissa Mayer to bring back the golden era of Yahoo! failed measurably. Just a few months back we did a detailed analysis of why and how Marissa Mayer’s MaVeNs strategy became nothing but a disaster for Yahoo!. The ex-Googler joined Yahoo! by replacing its interim CEO, Ross Levinsohn, in July 2012. Under the leadership of Mayer, Yahoo! had shown the signs of gaining its lost ground during the early days of Mayer in control. Soon, Mayer started struggling amid to the reports of having differences on strategies with its senior executives.

For the last few quarters Yahoo! has been bleeding badly, putting Marissa Mayer under immense pressure to control overheads of the company. She was also asked to create a respectable exit route for stakeholders, and of course, for herself as well. In Q2 2016, Yahoo!’s revenue dropped by 20% from a prior year. Even the acquisitions made by Yahoo! in the recent time were not bearing any fruits, the biggest disappointment came in the form of Tumblr, acquired by Yahoo! in 2013. The company had to write down the valuation of Tumblr by nearly 65%, from $1.1 billion, the amount Yahoo! paid to acquired Tumblr.

WHAT’S IN IT FOR VERIZON

Let me say it, Yahoo! is still a beast and it is still worth every penny Verizon Communication is paying to get hold of it. Verizon, the largest telecom & networking company in the US, serves to 145 million internet users and after acquiring Yahoo! the company can easily extend its advertising base by 200 million more visitors. To strengthen its core business and grip the Internet Verizon acquired AOL in 2015. However, amid to the growing competition from Google and Facebook, Verizon has been strengthening its presence in the mobile advertising space. With access to the personal information of millions of users Yahoo! has, control over multiple platforms likes Tumblr, Flickr, and ability to ride on the back of analytics tools like Flurry and BrightRoll, Verizon has a better chance to compete in digital space dominated by two internet giants.

YAHOO! WILL STILL BE LED BY EX-GOOGLER

No, we are not talking about Marissa Mayer, the ex-Googler. And, to be honest, it would be too early to analyze the possible fate of Marissa Mayer under the umbrella of Verizon. But, and interestingly, Yahoo! will be led by another former Googler: Tim Armstrong, who was the CEO of AOL, acquired by Verizon last year. While Marissa Mayer could receive a severance package worth about $57 million, Armstrong is expected to lead the combined Internet companies consisting of AOL and Yahoo! at Verizon. At this time, it looks feasible and makes sense as Armst

Intersting Story behind the name of Bluetooth

$
0
0
Bluetooth is named after a 10th century Scandinavian King, know the story behind it

The introduction of Bluetooth in technology came as a revolution, which not only improved the utility of mobile phones, but also made sharing of files a pushover. It gave a new meaning to the world of wireless communication. But have you ever pondered how Bluetooth got its name in the first place? Have you ever wondered where the origins of the term “Bluetooth” came from?

However, there is a very interesting story behind this.

In 1996, a number of companies – Intel, Ericsson, Nokia, and later IBM – were looking to standardize the industry around a short-range radio link for doing a number of things. Each company had been developing their own short-range radio technologies, but all the names they came up with sucked. That is when an obscure Scandanavian king came from the Middle Ages.

King Harald Gormsson is famous for ruling Denmark and then Norway between about 940 and about 986. King Harald was also famous for completing his father’s work of unifying the various Danish tribes into one Danish kingdom around 970. Even though, he was only able to maintain this unification for a few years.


Like many medieval rulers, he also had a nickname: Blatonn in Old Norse (a member of the Germanic family of languages) or Blatand in Danish. It means Bluetooth. The exact origin of the nickname is up for debate, but many scholars believe that King Harald was called Bluetooth because he had a conspicuous dead tooth that exactly looked black and blue. It does make sense.


So, what does a turn-of-the-last-millennium Viking king have to do with wireless communication? He was a uniter!

In the mid-1990s, the wireless communication field needed some uniting. Many corporations were developing competing, non-compatible standards. Several people saw this growing division as a weakness to widespread adoption of wireless.

That is when Intel engineer Jim Kardach took on the role of a cross-corporate mediator devoted to getting various companies together to develop an industry-wide standard for low-power, short-range radio connectivity. He was equally supported by Ericsson engineer Sven Mattisson.

While having a conversation on history, Mattisson told Kardach that he had just read a book called The Longships by Frans G. Bengtsson that compiled the travels of Danish warriors under the reign of King Harald “Bluetooth” Gormsson. Later, Kardach read The Vikings by Gwyn Jones that featured the reign of Harald, whom he viewed as an ideal symbol for bringing competing parties together, as he explained:

“Bluetooth was borrowed from the 10th-century, second king of Denmark, King Harald Bluetooth; who was famous for uniting Scandinavia just as we intended to unite the PC and cellular industries with a short-range wireless link.”

“Harald had united Denmark and Christianized the Danes!” Kardach wrote in a column a decade later. “It occurred to me that this would make a good codename for the program.”

All the different interested parties finally came together to form the Bluetooth Special Interest Group, which developed the agreed-upon standard we know and love today. “Bluetooth” was originally meant to be just a code name for the technology. It ultimately ended up sticking though and became the official name of the standard.


The millennium-old story doesn’t end there. The Bluetooth logo also derives from “Harald Blatand”, with the long-branch Nordic runes for “H” and “B” comprising the design you see in the blue oval of the logo. The now iconic Bluetooth logo is in fact a combination—officially known as a bind rune—of King Bluetooth’s initials in Scandinavian runes: ᚼ and ᛒ. When you join the two to make a bind rune and drop it on a blue background, you get the acquainted Bluetooth logo.

So, this is how, we got this name and the symbol! Interesting, isn’t it?

Top 3 Mobile Game Based on Pokémon Go

$
0
0
As I sit here and watch as millions of people every day download Pokemon Go on their smartphones, it makes me wonder if mobile gaming has evolved form the 2D gaming realm to an augmented reality-enhanced future.

While Pokemon Go is only one game, the implications on the gaming space will be gigantic. Not only will we see an influx of augmented reality-based games which utilize data from the real world. Here are a few predictions I will make for the next 2-3 years based on the extraordinary success of Pokemon Go:


#1 - At Least 2 Augmented Reality Games Will Eclipse the Records Broken By Pokemon Go Over the Next 18 Months

I'm betting that more than a handful of mobile gaming developers are already working on concepts for augmented reality games which follow in the footsteps of Pokemon Go. In fact I'm willing to guess that at least two, maybe as many as 3-4 games, will launch over the next 18 months and actually eclipse the success that Pokemon Go has seen in its early going. These games will likely take Augmented reality to the next level, allowing users to build upon the real world.

#2 - Augmented Reality Games will Drive a Market for Mobile Augmented Reality Headsets

I predict that the sheer excitement of such AR games will push hardware manufacturers to create AR headsets that are compatible with mobile phones much quicker then they may have originally planned to do so. While many manufacturers are developing virtual reality headsets, there may now be a sudden shift towards augmented reality headsets. Using mirrors and special optics, it will be entirely possible to transform a smartphone into an AR device, and it won't be all that expensive either.

#3 - A Minecraft-like Augmented Reality Game Will Be an Immense Success

While Pokemon Go has utilized augmented reality to make mobile gaming fun again, the next step will be to allow gamers to build upon the physical world. Imagine a game like Minecraft in which users can build a castle in their backyard or the end of their street, and then other users can interact with those creations. We will see a game which allows players to build virtual objects on a map of the physical world. We will then be able to explore the mixed reality world created by the entire gaming community as we walk along the street. This is where AR gaming is headed next and I think that within 2 years, perhaps 3, such a game will be here.

The future looks bright for AR gaming and I can;t wait to see what comes next. 

What is MiTM attack and How it works

$
0
0
When you request a page, the information travels from the server to your computer via a super-highway of cables, routers and computer switches that stretch the Internet across the world. Like highway robbers of old, modern attackers knows you are vulnerable at every “junction.” These spots are where your data can be intercepted, read and even altered.

What is MiTM attack ?

A man-in-the-middle attack is a procedure that allows an attacker to interpose between you and the computer you are communicating with to read the conversation or alter it. The procedure was extremely common before the massive switch to HTTP-Secure, and it is still common nowadays, although a little more complicated to carry out.
After targeting PCs for years, the omnipresent man-in-the-middle attacks have moved on to mobiles. On account of failing to assess the impact of these attacks, consumers connect their phones to public networks to stay connected, especially when on vacation.

The biggest threat arises from the slow detection rate. Users can’t always figure out if the network they are on is legitimate or if some is listening to the traffic, whether at the airport, hotel or coffee place down the street. Our internet addiction has also driven us to use the same device for both business and pleasure, automatically exposing ourselves to risks. End-users are the biggest threat to enterprises; once connected to an unreliable network corporate data, credentials or email could be leaked.

How MiTM attacks work

When two parties start a conversation, they typically establish a connection and exchange what are called public keys – keys used to encrypt conversations before they get sent across the wires. Let’s imagine Alice and Bob chatting on the web. When Alice reaches out to Bob, she sends her public key. Bob will encrypt all the messages for Alice with her public key. Bob in turn would also send Alice his public key. When Alice gets the encrypted message from Bob, she decrypts it with her private key and reads it.

Now imagine a third person between Alice and Bob. His name is Peter. Peter intercepts Alice’s public key as it travels to Bob and substitutes it with his own public key. He also intercepts Bob’s public key and substitutes it with his own as it travels to Alice. Now both Alice and Bob encrypt information with Peter’s public key and Peter can decrypt them with his own private key. After decryption, he reads the message, maybe alters it, then encrypts it with Alice’s public key intercepted in the first step and forwards the message to Alice. He proxies all communication to and from Bob or Alice and neither of them knows he’s listening.

Rogue or unprotected Wi-Fi networks are not the only entry point a hacker can use to launch a man-in-the-middle attack. Each time you go online and use a proxy service to anonymize your IP address or circumvent the restrictions at your workplace, remember that the proxy server normally acts as a man in the middle.

Your page visits and online activity like file transfers, financial transactions or emails can be captured by criminals through a hostile proxy server. You are exposing all your information to third parties.

VPN servers should safeguard your infrastructure by keeping your connection encrypted. Compromised or rogue VPN servers also could allow third parties to steal your data but, even worse, they can reroute your traffic and use your internet connection for illegal schemes. In the absence of a secure connection, by the time you figure out you’ve installed a malicious program or website it could be too late.

How to identify them

If you’re not tech-savvy, there’s not much you can do about this. Man-in-the-middle attacks are very difficult to detect, so prevention is better than cure.

If you’re on vacation and your phone automatically connects to a network, you could fall victim to a MitM attack. If asked to install a VPN app or accept a digital certificate, you’re on your way to a man-in-the-middle attack.  The easiest way t

Make Badge(Item count) in Android [Tutorial]

$
0
0
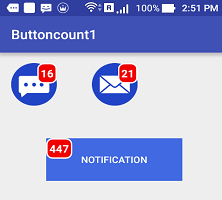
In this tutorial we are aiming to see a way to create Badge (Item Count) to a android Application. Badge is really used to show number of notification, message,product count .We can see many android app use Badge to their Application these days. there's no cutoff way to do it we'll do it by coding ourself. during this application we are aiming to see a way to create Badge in Image Button and button.

Requirement 


  1. JDK 7.0 or Above
  2. Android Studio 2.0

Steps to Follow:

Inside Drawable  folder  create an xml file item_count  and  create a rectangle with 8dp  corner radius.

item_count.xml

<?xml version="1.0" encoding="utf-8"?>
<shapexmlns:android="http://schemas.android.com/apk/res/android"
android:shape="rectangle">
<cornersandroid:radius="8dp"/>
<solidandroid:color="#f20000"/>
<stroke
android:width="2dip"
android:color="#FFF"/>
<padding
android:bottom="5dp"
android:left="5dp"
android:right="5dp"
android:top="5dp"/>
</shape>

To modify   activity_main.xml  add  Relativelayout , Buttons and text . your activity_main.xml  will be like below. And  add the required images in the Drawable folder for this layout .

activity_main.xml 

<?xml version="1.0" encoding="utf-8"?>
<!--Adding Badge (Item Count)/Notification Count to Android Button-->
<RelativeLayoutxmlns:android="http://schemas.android.com/apk/res/android"
android:layout_width="fill_parent"
android:layout_height="match_parent"
android:gravity="center_horizontal"
android:orientation="vertical"
android:padding="16dp">

<RelativeLayout
android:id="@+id/badge_layout1"
android:layout_width="wrap_content"
android:layout_height="wrap_content">

<RelativeLayout
android:id="@+id/relative_layout"
android:layout_width="wrap_content"
android:layout_height="wrap_content">

<Button
android:id="@+id/button1"
android:layout_width="65dip"
android:layout_height="65dip"
android:background="@drawable/chat_icon"/>
</RelativeLayout>

<TextView
android:id="@+id/badge_notification_1"
android:layout_width="wrap_content"
android:layout_height="wrap_content"
android:layout_alignRight="@id/relative_layout"
android:background="@drawable/item_count"
android:text="16"
android:textColor="#FFF"
android:textSize="16sp"
android:textStyle="bold"/>
</RelativeLayout>

<RelativeLayout
android:id="@+id/badge2"
android:layout_width="wrap_content"
android:layout_height="wrap_content"
android:layout_marginLeft="50dp"
android:layout_toRightOf="@+id/badge_layout1">

<RelativeLayout
android:id="@+id/relative_layout1"
android:layout_width="wrap_content"
android:layout_height="wrap_content">

<Button
android:id="@+id/myButton1"
android:layout_width="65dip"
android:layout_height="65dip"
android:background="@drawable/email_icon"/>
</RelativeLayout>

<TextView
android:id="@+id/badge_notification_2"
android:layout_width="wrap_content"
android:layout_height="wrap_content"
android:layout_alignRight="@id/relative_layout1"
android:background="@drawable/item_count"
android:text="21"
android:textColor="#FFF"
android:textSize="16sp"
android:textStyle="bold"/>
</RelativeLayout>

<RelativeLayout
android:id="@+id/badge4"
android:layout_width="wrap_content"
android:layout_height="wrap_content"
android:layout_below="@+id/badge_layout1"
android:layout_marginTop="50dp">

<RelativeLayout
android:id="@+id/relative_layout3"
android:layout_width="wrap_content"
android:layout_height="wrap_content">

<Button
android:id="@+id/myButton4"
android:layout_width="wrap_content"
android:layout_height="65dip"
android:background="#4169E1"
android:elevation="4dp"
android:paddingLeft="50dp"
android:paddingRight="50dp"
android:text="Notification"
android:textColor="#fff"/>
</RelativeLayout>

<TextView
android:id="@+id/badge_notification_4"
android:layout_width="wrap_content"
android:layout_height="wrap_content"
android:layout_alignLeft="@id/relative_layout3"
android:background="@drawable/item_count"
android:text="427"
android:textColor="#FFF"
android:textSize="16sp"
android:textStyle="bold"/>
</RelativeLayout>
</RelativeLayout>
 And your MainActivity.java  is default content as  below

MainActivity.java

importandroid.support.v7.app.AppCompatActivity;
importandroid.os.Bundle;
publicclassMainActivityextends AppCompatActivity {
@Override
protectedvoidonCreate(Bundle savedInstanceState) {
super.onCreate(savedInstanceState);
setContentView(R.layout.activity_main);
}
}
Now run your application  , you will see the screensot like  below :

Demo

Hope you enjoy and tutorial is helpful for your project.

How to Modify Nexus Launcher’s Appearance in Nova

$
0
0
Earlier nowadays the world was treated to a sneak peek at the new Nexus launcher that is believed to be coming with the 2016 Nexus phones. This new launcher additional a chevron to open the app drawer and a shortcut to Google currently at the top of the homescreen. Now due to some incredibly fast work from Corey Zonin anyone will have a really similar experience in Nova!


You can also see a short video we made here of the setup in action, running on a Huawei Mate 8 (with the display density tweaked to allow for more screen real estate).

Check this outHydrogen OS - Android Launcher


To start you will need the two Zooper widgets found here, Zooper Widget Pro ($2.99), Nova, and Polycon icon pack.

Setting up the widgets


  1. Install Zooper Widget
  2. Place attached .zw files in sdcard/ZooperWidget/Templates
  3. Add a 4×1 Zooper Widget to your homescreen on the top row
  4. Tap it to configure > select SD Card > select nexus_launcher_top
  5. Use the scaling options to adjust the size of the widget to fit your screen
  6. Back out of Zooper and that widget should be ready
  7. Next for the chevron above the dock
  8. Add a 1×1 Zooper Widget to your homescreen and center it horizontally right above your dock
  9. Tap it to configure > select SD Card > select nexus_launcher_drawer
  10. Back out of Zooper and that widget should be good to go
Create your ownApex Launcher Theme Tutorial

Adjusting Nova Settings

  1. Desktop
    1. Width padding > None
    2. Persistent search bar disabled
    3. Page indicator > None
  2. App & widget drawers
    1. App drawer style > Vertical
    2. Card background disabled
    3. Background > White at 10% transparency
    4. Enable fast scrollbar enabled
    5. Scroll accent color > teal
    6. Transition animation > Slide up
  3. Dock
    1. Dock Background
      1. Shape > Rectangle
      2. Content > Tint > White
      3. Transparency > 90%
    2. Dock icons > 5
  4. Gestures & inputs
    1. Swipe up > App Drawer
From here on you can tweak and play to your hearts content, tapping the Google logo in the clock widget will launch Google Now while tapping the date in the clock widget will open Google Calendar. Swiping up anywhere on the homescreen will open the app drawer and tapping on the chevron above the dock will open the app drawer

Try it out and let us know what you think in the comments below!

Scientist discovered new form of Light

$
0
0
Scientists from Imperial college, London have discovered a brand new form of light. This analysis offers a new way to produce a new form of light. Scientists say, it's attainable by binding light to a single electron by combining both properties.

new form of light discovered


It allows researchers to investigate quantum physical phenomena, that controls particles smaller than atoms, on a visible scale.

For instance, light, which normally travels in a straight line, would trace the surface of the material if it was bound to a single electron on it, following the electron’s path across the surface of the material. Conversely, electrons in an electrical circuit will normally stop when faced with a defect or imperfection in the conducting material, but with the aid of photons, “the electron would still be able to travel onwards.”

Generally, light collaborates with an entire host of electrons,which is present on the surface and inside the material. Scientists found, it's able to collaborate single electron on the surface by using theoretical physics. Theoretical physics is used to design light behavior and topological insulators. Topological insulators have recently discovered a class of materials.

Thus, it generates a coupling that brings a number of the properties of the light and also the electron. once light is bounded with an electron, it follows its path by seeking the surface of the material.
Dr. Vincenzo Giannini and colleagues design this interaction around a nanoparticle. This nanoparticle is formed of a topological stuff and nearly below 0.00000001 meters in diameter.


Their design shows, light is taking the property of the electron and circulating the particle. so the electron additionally taking on some of the properties of the light.

Artistic image of light trapped on the surface of a nanoparticle topological insulator. Credit: Vincenzo Giannini
When electrons are commonly traveling through electrical circuits, they will stop once faced with a defect. though scientists discovered, electrons are able to move further with the assistance of light even though there are imperfections on the surface.


If this can be used in photonic circuits, they will become a lot of strong and less vulnerable to disruption and physical imperfections.

“The results of this analysis can have a huge impact on the approach we conceive light. Topological insulators were discovered within the last decade. however they already providing us with new phenomena to study and new ways that to explore important ideas in physics.”
-Dr. Giannini

It should be possible to watch the phenomena he has modeled in experiments using current technology, and also the team is working with experimental physicists to make this a reality,” he added.

He believes, this new form of light could be scaled up. Thus, the phenomena are discovered much more simply.

Currently, quantum phenomena will only be seen once observing terribly small objects or objects that are super-cooled, however this might enable scientists to study these kinds of behavior at temperature.

Twitter may be acquired by Saudi Prince

$
0
0
After Linkdien and Yahoo, Twitter may be acquired by Saudi's Prince.

Saudi Prince Al - Waleed Talal willing to buy

Last year, Twitter made ​​this way , but the deal had failed . According to Twitter reports Menhetton his office is looking to rent a place . Reports that Saudi Prince Al - Waleed Talal  and Ballmer are willing to buy Twitter . Twitter has not yet responded to the reports .


Twitter has poor economic situation at these day. This microblogging site is decide to rent their San Fransisco headquarter to face that trouble.

According to the sfgate brokerage firm Kresa twitter Headquarters from taking place is discussed in the rent . Twitter almost 183 642 square feet is thinking of hiring .

"We use office space more effectively and efficiently are considered . San Francisco in the mid-market area we are committed to its place . "
-Twitter spokesman
Saudi prince Alwaleed bin Talal declared that it had increased stake in Twitter to more than five-hitter. The up within the stake comes right when the appointment of Jack Dorsey as the new ceo. it's attention-grabbing to notice that the prince has previously been opposed to the appointment of Mr. Dorsey as the CEO, primarily due to his ceo status at square.

The Saudi have prince Alwaleed and Kingdom Holding currently owns 5.17% of the company after a $50 million investment within the micro-blogging website. The billionaire created his initial investment of $300 million within the company in 2011. The investment makes him the second-biggest capitalist in Twitter when Evan Williams, who owns 6.9% of the company. The Saudi fund is of the view that Twitter’s lows offer buying chance for investor to dive in.


Twitter's issues solved?

On Monday, the San Francisco-based company solved  its CEO problem by appointing Mr. Dorsey, Co-founder of Twitter as its new CEO. due to the actual fact that prince Alwaleed initially didn't approve of Mr. Dorsey, it makes us surprise what the real reason behind the rise in investment could be. it might be the case that the prince currently thinks that Mr. Dorsey has the capabilities to run two firms at a similar time. another reason may well be the introduction of the project "Moments" by the social platform, that is assumed to become huge within the returning years. The Saudi prince is understood for his smart investments and he very should be seeing some positives beginning from Twitter in future.

But Twitter failed to resolve their economic problem in upcoming time. It may be acquired by Saudi Prince Al - Waleed Talal  and Ballmer.

How to Detect Face in Android

$
0
0
Android detect face is an interesting topic that will be covered in this tutorial. It will use the camera to get the picture and then the app will draw some rectangle around the faces detected in the image. To do it we simply use the Android API like:

  • FaceDetector used to detect face in the bitmap
  • Face  object that contains information about face detected

So we have to make three steps in our apps:

  • Take the picture
  • Detect faces in the picture
  • Draws the rectangles around the faces detected

Take the picture with camera using Android

This step is quite simple because we have simply to invoke an intent and get ready to receive the result. The Intent is very simple:
Intent cameraIntent = new Intent(android.provider.MediaStore.ACTION_IMAGE_CAPTURE);
startActivityForResult(cameraIntent, CAMERA_RETURN_CODE);
To retrieve the result (the picture taken) we have to override a method in our activity:
@Override
protectedvoidonActivityResult(int requestCode, int resultCode, Intent data) {
if (requestCode == CAMERA_RETURN_CODE) {
Bitmap cameraBmp = (Bitmap) data.getExtras().get("data");
}
}
At grey coded line we retrieve our picture using extra with data key.

ndroid Detect face in the picture


At this point, we use the API shipped with Android SDK since level 1. To implement our logic we create a custom component that extends ImageView, we call it FaceImageView.
publicclassFaceImageViewextends ImageView {
...
}
To detect the faces, we have first convert the image in Bitmap in 556 format otherwise we can’t use the image as stated in API, so we have:
Bitmap tmpBmp = image.copy(Config.RGB_565, true);
Now we have our image in the right format, we create an instance of the FaceDetector:
FaceDetector faceDet = new FaceDetector(tmpBmp.getWidth(), tmpBmp.getHeight(), MAX_FACES);
passing the image width and image height and the number of faces we want to detect (in our case it is simple constant).
Now we invoke the findFaces method to detect the faces, as a result we expect an array of Face instance that must have the length equals to the number of faces we want to detect:
faceDet.findFaces(tmpBmp, faceList);
where faceList is our array.
Now we have to analyze each item in our array and get the result. We simply want to get the face midpoint and the eyes distance. We use these two information to draw the rectangle for each face detected:
for (int i=0; i < faceList.length; i++) {
Face face = faceList[i];
Log.d("FaceDet", "Face ["+face+"]");
if (face != null) {
Log.d("FaceDet", "Face ["+i+"] - Confidence ["+face.confidence()+"]");
PointF pf = new PointF();
face.getMidPoint(pf);
Log.d("FaceDet", "t Eyes distance ["+face.eyesDistance()+"] - Face midpoint ["+pf+"]");
RectF r = new RectF();
r.left = pf.x - face.eyesDistance() / 2;
r.right = pf.x + face.eyesDistance() / 2;
r.top = pf.y - face.eyesDistance() / 2;
r.bottom = pf.y + face.eyesDistance() / 2;

rects[i] = r;
}
}
At grey line we calculate the rectangle vertex and we store them in a RectF object. If we want to run the app we can use a real smartphone or avd configured in our dev environment. In this case be sure you have configured the camera to use:


Running the example and looking at the log we have:


We notice that the app detected one face while others are null because no more faces exist in the picture.

Draw rectangles around the faces detected

The last step is drawing rectangles around the faces detected. In this case we can use the information, retrieved before, in this way:
@Override
protectedvoidonDraw(Canvas canvas) {
super.onDraw(canvas);
Paint p = new Paint();

canvas.drawBitmap(image, 0, 0, p);
Paint rectPaint = new Paint();
rectPaint.setStrokeWidth(2);
rectPaint.setColor(Color.BLUE);
rectPaint.setStyle(Style.STROKE);

for (int i=0; i < MAX_FACES; i++) {
RectF r = rects[i];
if (r != null)
canvas.drawRect(r, rectPaint);
}
}
Hope it will help you in your existing project.

PlatformIO - Arduino Alternative IDE for IoT integrated platform

$
0
0
When developing Arduino sketch,  we all use Arduino IDE, anyway, there are several Arduino alternative IDE. This alternative IDEs are useful and more user-friendly.
Arduino IDE is the first IDE we all use when approaching to Arduino development for the first time. It is simple and provides all the features to write, compile and upload the code to Arduino boards. It is based on Java and runs on Windows, OS X and Linux. Arduino IDE is a complete solution, anyway, it does not have all the features you could find in Eclipse or IntelliJ.

Best IOT Cloud Platform You should Know

I was looking for an Arduino alternative IDE that could provide a more “robust” IDE having, at the same time, all the features of Arduino IDE. This Arduino alternative IDE must be free of charge and open source. Even if there are several options, I focused my attention on PlatformIO.

Platformio is an interesting alternative IDE that provides almost all the features I was looking for.
First of all, it is opensource and you can find the source code at GitHub repository. Second, it is free to use and it has a large community that supports it.

Arduino alternative IDE: Platformio

  • C/C++ Code Completion
  • Multi-project
  • Theme support
  • Cross-platform support
  • Serial port monitor
  • Library management system
  • Continuous integration
I'm using PlatformIO to build #IoT projects! I found it at http://www.geekonjava.blogspot.com

How to build your first Arduino project

  • Create a new project
  • Open an existing project
  • Import an Arduino Project

Arduino Libraries management


This is IDE has a clean and easy-to-use interface, very attractive. It offers not only a visual IDE to develop IoT projects but it has a CLI (Command Line Interface). It is based on Python and runs on different OS like Windows, OS X and Linux.
The main features are:
This Arduino alternative IDE supports several boards like Arduino UNO, Arduino MKR1000 and in general Arduino development boards. Moreover, it supports Raspberry PI family and so on. So this is a complete solution to develop IoT projects in an easy and intuitive way. The interface is completely different compared to Arduino IDE.

You can read also : Zephyr - Tiny Linux OS for Internet of Things
Now it is time to start using PlatformIO. The best way to test is building a simple Arduino project.  Implementing a simple project helps us to evaluate this IoT IDE and, at the same time, we can check if it is a real improvement compared to Arduino IDE.
So the first step is the installation process that is very simple and straight. Once the IDE is installed, let us run the app. It takes a while before you can use it because the IDE starts an update/installing process:
platformio ide
After this process is completed, you have the PlatformIO (Arduino Alternative IDE) up and running:
arduino alternative ide
As you can notice the interface is very clean with all the most important commands on the left bar. We have several options:
In our case, we want to create a new project so let us click on the first item. After inserting the required fields (like the board we are using), the project is ready. You can consider the project like a folder where you can put your project files. We create a simple test file (testLed.cpp), with this content:
PlatformIO IDE alternative
The first thing, you should notice, is the code completion: this is a very useful feature. The syntax highlighting is also attractive and help to emphasize language keywords.
Now it is time to build and run our simple sketch:
PlatformIO arduino
One important aspect is the library management. As you know already Arduino IDE has its own library management system and you can use it to download libraries. PlatformIO has a different way to handle libraries.  You can access it using the Library Manager. Before installing a library, you have to find thelibrary id using the library registry. Opening the lib web page, you find a search area where you should insert the library name you are looking for:
arduino library manager
and the result is shown below:
platformio library registry
Now you have the library id and you use this id to install the library:
arduino install library
where 19 is the library id. The library is ready to use.
At the end of this post, you hopefully know an Arduino alternative IDE.

Top 10 Best Maven Plugins for Java Developers

$
0
0
In the last couple of years, maven has become the de-facto build tool for Java applications. Although there are challenges exists from tools like Gradle, however i believe the dominance of maven can help it to win the ultimate battle. When I started with maven, i used to be pleased with just dependency management on the other hand I come back to know regarding maven plugins that allow you to customise your build up to the level you'll do with ant. These plugins give true power to maven to modify most of the build related task e.g. compilation, testing, packaging, deployment, and even committing the source code into the remote source repository.


Several Java developers who use maven daily are sometimes not aware of these essential maven plugins mostly as a result of maven just works, or someone has already done the hard work for them.

Maven uses conventions over configuration which means even if you do not understand much about maven you can use it to create your project and manage dependency. So as to bridge that gap, i'm going to share 10 essential maven plugins for Java developers. Knowing these plugins and what the do can help you to know however maven works normally and allow you to higher management your build process.

Top 10 Best Maven Plugins for Java Developers

Here is my list of useful and essential maven plugins every Java developer should be aware of. There is a good chance that you might be using many of them without knowing much about them, this article will help you to explore them better.

1. maven-compiler-plugin


This is the most important maven plugin. You almost always use it unknowingly. This plugin compiles your Java code from the standard location Maven specifies e.g. /src/main/java and /src/main/resources. You can customize the default behavior of maven-compiler-plugin by specifying instructions in pom.xml file. For example, in following pom.xml file we are telling maven-compiler-plugin to expect Java 7 source, and output Java 7 specific classes.
<build>
<sourceDirectory>src</sourceDirectory>
<plugins>
<plugin>
<artifactId>maven-compiler-plugin</artifactId>
<version>3.1</version>
<configuration>
<source>1.7</source>
<target>1.7</target>
</configuration>
</plugin>
</plugins>
</build>
You can also see Maven: The Definitive Guide to learn more about this plugin.

2. maven-surefire-plugin


The Maven Surefire plugin is the default plugin for running unit tests. You can also customize the behavior of this plugin by specifying configuration in pom.xml. The Surefire Plugin has only one goal: surefire:test runs the unit tests of an application.

3. maven-assembly-plugin


The Maven Assembly plugin is another useful maven plugin which allows you to create your project distribution in zip or tar format, suitable for deployment in Linux environment. We used to do this for our project, where tar file contains all config, binary and resources together. Though it's not a good idea to release binary and config together, sometimes it makes a lot of sense in smaller projects. Btw, all goals except assembly:single have been deprecated of maven-assembly-plugin.

4. maven-jetty-plugin


The maven jetty plugin is pretty awesome for Java web developers as it makes Java web application development much easier. In order to run your Servlet JSP based project, rather than packaging and creating a WAR file and deploying it into tomcat server, you can simply run mvn jetty:run and your web application start. It uses embedded Jetty Servlet container to run your Java web application.

5. maven-dependency-plugin


The Maven Dependency Plugin is another mandatory plugin to debug or understand a POM and how you get some dependency (transitively). This plugin has several goals but some of the most useful are following:
dependency:analyze - analyzes the dependencies of this project and determines which are: used and declared; used and undeclared; unused and declared.
dependency:tree - displays the dependency tree for this project
dependency:build-classpath tells Maven to output the path of the dependencies from the local repository in a classpath format to be used in java -cp. The classpath file may also be attached and installed/deployed along with the main artifact.

6. maven-jar-plugin


This is the plugin which creates a Java Archive (JAR) file from the compiled project classes and resources. You almost always use this plugin to create JAR files. the latest version of this plugin is 3.0.1

7. maven-war-plugin


This plugin creates a Web Archive (WAR) file from the compiled project classes, resources, and web.xml. You use this plugin while building Java web application as they are deployed into Servlet container like Tomcat or enterprise Server as WAR file.

8. maven-deploy-plugin


This plugin is responsible for uploading the project artifacts e.g. JAR, WAR, source code, Java docs etc to the internal remote repository. The current version of deploy plugin is 2.8.2 released in August 2014. See Maven Essentials to learn more about key maven concepts like local and remote repository.

9. maven-resource-plugin

This Maven resource plugin is responsible for copying of Java projects resources to the output directory. There are two different kinds of resources in Maven projects: main resources and test resources. The difference is that the main resources are used by the main production code while the test resources are associated with the test source code, which is only used while running unit test or integration tests.

10. spring-boot-maven-plugin

The Spring Boot maven plugin is one of the useful plugins to develop Java web application using Spring Boot library. It collects all the jars on the classpath and builds a single, runnable "über-jar", which makes it more convenient to execute and transport your service. It also searches for the main() method to flag as a runnable class, and most importantly it provides a built-in dependency resolver that sets the version number to match Spring Boot dependencies.


That's all about some of the essential Maven plugins for Java development. There are tens of Maven plugins but you don't use them always, these are the plugins which you are most likely to encounter and use them in your day to day Java development work. Knowing a little bit more about these maven plugins will not only help you to understand your pom.xml file but also how things work in Maven environment e.g. how your project gets compiled or how unit tests are run in Maven build environment. This knowledge also helps you to customize a particular phase of Maven lifecycle to suit your projects need.

Struts2 AngularJS CRUD Example - Insert Operation

$
0
0
This tutorial can concentrate on creating, reading, updating, deleting and searching database records. we'll make out using a Google’s AngularJS, Struts2 and MySQL.

As for the user interface, rather than Bootstrap, we'll use materialize CSS – a modern responsive front-end framework based mostly additionally on Google’s Material design.


FILE STRUCTURE

Knowing the file structure can offer us an outline of what Struts2 files can we need to create and wherever the assets should be placed.

DATABASE STRUCTURE AND CONNECTION

We have to make a database, then a table with the subsequent table structure, and a Struts2 file that we'll use for database connection.

1.1 create the database table

Run the subsequent SQL code on your PhpMyAdmin or any Database you want. this can be to create our database table. By the way, the database name we used in this tutorial was named “strutsangularcrud”.
--
-- Table structure for table `products`
--

CREATETABLE IF NOTEXISTS `products` (
`id` int(11) NOTNULL AUTO_INCREMENT,
`name` varchar(512) NOTNULL,
`description` textNOTNULL,
`price` int(11) NOTNULL,
PRIMARYKEY (`id`)
) ENGINE=MyISAM DEFAULT CHARSET=latin1 AUTO_INCREMENT=64 ;

Now dive to some coding part in file structure you can see i made three package(com.blogspot.geekonjava.db, com.blogspot.geekonjava.gs, com.blogspot.geekonjava.json) as per name convention you can understand easily that what purpose of which package.
  • com.blogspot.geekonjava.db
This package for all database connectivity part and in this example i made two java file first for database configuration and other for product database part.
Note : So put the mysql-connector.jar in you WEB-INF/lib
Info : Don't panic to find extra libraries download the project and you'll get everything.

ConnectionConfiguration.java

package com.blogspot.geekonjava.db;

importjava.sql.Connection;
importjava.sql.DriverManager;

publicclassConnectionConfiguration {


publicstaticfinal String URL = "jdbc:mysql://localhost:3306/strutsangularcrud";
/**
* In my case username is "root" *
*/
publicstaticfinal String USERNAME = "root";
/**
* In my case password is "1234" *
*/
publicstaticfinal String PASSWORD = "";

publicstatic Connection getConnection() {
Connection connection = null;

try {
Class.forName("com.mysql.jdbc.Driver");
connection = DriverManager.getConnection(URL, USERNAME, PASSWORD);
} catch (Exception e) {
e.printStackTrace();
}

return connection;
}

}

  • com.blogspot.geekonjava.gs
It is for all getter setter object will be here like in this project i made:

Product.java 


package com.blogspot.geekonjava.gs;

publicclassProduct {

privateint id;
private String name;
private String description;
privateint price;
publicintgetId() {
return id;
}
publicvoidsetId(int id) {
this.id = id;
}
public String getName() {
return name;
}
publicvoidsetName(String name) {
this.name = name;
}
public String getDescription() {
return description;
}
publicvoidsetDescription(String description) {
this.description = description;
}
publicintgetPrice() {
return price;
}
publicvoidsetPrice(int price) {
this.price = price;
}

publicProduct(){}
publicProduct(String name, String description, int price)
{
this.name=name;
this.description=description;
this.price=price;
}

}

MAKE USE OF YOUR HTML CODING SKILLS

1.1 Create basic HTML code structure for index.jsp

Create the index.jsp file. This is the only page the user has to interact with. Make it ready for AngularJS, Material Design and jQuery by including the necessary library sources.
<!DOCTYPE html>
<html>
<head>

<metacharset="utf-8">
<metahttp-equiv="X-UA-Compatible"content="IE=edge">
<metaname="viewport"content="width=device-width, initial-scale=1">

<title>Insert Products</title>

<!-- include material design CSS -->
<linkrel="stylesheet"href="css/materialize.min.css"/>

<!-- include material design icons -->
<linkhref="https://fonts.googleapis.com/icon?family=Material+Icons"rel="stylesheet"/>

<!-- custom CSS -->
<style>
.width-30-pct{
width:30%;
}

.text-align-center{
text-align:center;
}

.margin-bottom-1em{
margin-bottom:1em;
}
</style>


</head>
<body>

<!-- page content and controls will be here -->


<!-- page end here -->

<!-- include jquery -->
<script src="https://ajax.googleapis.com/ajax/libs/jquery/3.1.0/jquery.min.js"></script>
<!-- material design js -->
<script src="js/materialize.min.js"></script>

<!-- include angular js -->
<script src="https://ajax.googleapis.com/ajax/libs/angularjs/1.5.7/angular.min.js"></script>

<script>
// angular js codes will be here

// jquery codes will be here

</script>

</body>
</html>

1.2 Put the most important DIV tag

Inside this “div” tag is where every main content of the page will be loaded. Add the following code after the opeing “body” tag.
<divclass="container"ng-app="myApp"ng-controller="productsCtrl">
<divclass="row">
<divclass="col s12">
<h4>Products</h4>

</div><!-- end col s12 -->
</div><!-- end row -->
</div><!-- end container -->

1.3 HTML code of “create product form”

Put the following code under the “h4” tag in section 1.2. It is a form shown via modal or pop up. We will also use the same HTML form for updating a record later.
<!-- modal for for creating new product -->
<divid="modal-product-form"class="modal">
<divclass="modal-content">
<h4id="modal-product-title">Create New Product</h4>
<divclass="row">
<divclass="input-field col s12">
<inputng-model="name"type="text"class="validate"id="form-name"placeholder="Type name here..."/>
<labelfor="name">Name</label>
</div>

<divclass="input-field col s12">
<textareang-model="description"type="text"class="validate materialize-textarea"placeholder="Type description here..."></textarea>
<labelfor="description">Description</label>
</div>


<divclass="input-field col s12">
<inputng-model="price"type="text"class="validate"id="form-price"placeholder="Type price here..."/>
<labelfor="price">Price</label>
</div>


<divclass="input-field col s12">
<aid="btn-create-product"class="waves-effect waves-light btn margin-bottom-1em"ng-click="createProduct()"><iclass="material-icons left">add</i>Create</a>

<aid="btn-update-product"class="waves-effect waves-light btn margin-bottom-1em"ng-click="updateProduct()"><iclass="material-icons left">edit</i>Save Changes</a>

<aclass="modal-action modal-close waves-effect waves-light btn margin-bottom-1em"><iclass="material-icons left">close</i>Close</a>
</div>
</div>
</div>
</div>

1.4 HTML button to show the “create product HTML form”

Put the following code under the code in section 1.3, it will make a floating red button located at the lower right corner of the page.
<!-- floating button for creating product -->
<divclass="fixed-action-btn"style="bottom:45px; right:24px;">
<aclass="waves-effect waves-light btn modal-trigger btn-floating btn-large red"href="#modal-product-form"ng-click="showCreateForm()"><iclass="large material-icons">add</i></a
</div>

1.5 AngularJS Basic Code

Put the following AngularJS code inside the “script” tag of section 1.1 above.
var app = angular.module('myApp', []);
app.controller('productsCtrl', function($scope, $http) {
// more angular JS codes will be here
});

1.6 AngularJS “showCreateForm” function to show “create product form”

Put the following code inside the app.controller curly braces in section 1.5 above.
$scope.showCreateForm = function(){
// clear form
$scope.clearForm();

// change modal title
$('#modal-product-title').text("Create New Product");

// hide update product button
$('#btn-update-product').hide();

// show create product button
$('#btn-create-product').show();

}

1.7 AngularJS “clearForm” function to remove any form values that exists

Put the following code under the “showCreateForm” function code in section 1.6 above.
// clear variable / form values
$scope.clearForm = function(){
$scope.id = "";
$scope.name = "";
$scope.description = "";
$scope.price = "";
}

1.8 AngularJS “createProduct” function

The following code is triggered when the “Create Product” button on the modal or pop up form was clicked. Put it under the code in section 1.8.
// create new product 
$scope.createProduct = function(){

// fields in key-value pairs
$http.post('create_product.php', {
'name' : $scope.name,
'description' : $scope.description,
'price' : $scope.price
}
).success(function (data, status, headers, config) {
console.log(data);
// tell the user new product was created
Materialize.toast("New product created", 4000);

// close modal
$('#modal-product-form').closeModal();

// clear modal content
$scope.clearForm();

// refresh the list
$scope.getAll();
});
}

1.9 jQuery script to initialize modal

This small jQuery script will initialize our modal or pop up. This modal is used for “create product” and “update product” pop up forms.
$(document).ready(function(){
// initialize modal
$('.modal-trigger').leanModal();
});
AngularJS deals with JSON . So firstly need some change in struts.xml

struts.xml

Put below code under the <Struts> tag

<packagename="default"extends="json-default">

<actionname="addproduct"class="com.blogspot.geekonjava.json.ProductJSONAction"method="getFileName">
<resulttype="json"/>
</action>

</package>


And now this time to add third and last package

  • com.blogspot.geekonjava.json
In this package all the JSON part which AngularJS will be dealing
Note : So put the json-simple.jar in you WEB-INF/lib
Info : Don't panic to find extra libraries download the project and you'll get everything.

ProductDB.java


package com.blogspot.geekonjava.db;

importjava.sql.Connection;
importjava.sql.PreparedStatement;
importjava.sql.ResultSet;
importjava.sql.SQLException;
importjava.sql.Statement;
importjava.util.ArrayList;
importjava.util.List;

importorg.json.simple.JSONObject;
importorg.json.simple.parser.JSONParser;

importcom.blogspot.geekonjava.gs.Product;

publicclassProductDB {


publicstatic Product fileToString(String filename)
{

Product p = new Product();
JSONParser parser = new JSONParser();
try {

Object obj = parser.parse(filename);
JSONObject json = (JSONObject) obj;
String name = (String) json.get("name");
String description = (String) json.get("description");
int price = Integer.parseInt((String) json.get("price"));
ProductDB.insert(name, description, price);
System.out.println(name);
}
catch (Exception ex) { ex.printStackTrace(); }
return p;

}


publicstaticvoidinsert(String name, String description, int price) {
System.out.println("in insert "+name+ description);
Connection connection = null;
PreparedStatement preparedStatement = null;
System.out.println("11111111111111111111111");
try {
connection = ConnectionConfiguration.getConnection();
preparedStatement = (PreparedStatement) connection.prepareStatement("INSERT INTO products (name,description,price)" +
"VALUES (?, ?,?)");
System.out.println("2222222222222222");
preparedStatement.setString(1, name);
preparedStatement.setString(2, description);
preparedStatement.setInt(3, price);
preparedStatement.executeUpdate();


} catch (Exception e) {
e.printStackTrace();
} finally {
if (preparedStatement != null) {
try {
preparedStatement.close();
} catch (SQLException e) {
e.printStackTrace();
}
}

if (connection != null) {
try {
connection.close();
} catch (SQLException e) {
e.printStackTrace();
}
}
}
}
}

ProductJSONAction.java


package com.blogspot.geekonjava.json;

importjava.io.IOException;
importjava.util.ArrayList;
importjava.util.HashMap;
importjava.util.List;
importjava.util.Map;

importjavax.servlet.http.HttpServletRequest;

importorg.apache.commons.io.IOUtils;
importorg.apache.struts2.ServletActionContext;

importcom.blogspot.geekonjava.db.ProductDB;
importcom.blogspot.geekonjava.gs.Product;
importcom.opensymphony.xwork2.Action;

publicclassProductJSONAction{
static HttpServletRequest request ;


publicstatic String getFileName()
{
try {
request = ServletActionContext.getRequest();
String filename = IOUtils.toString(request.getInputStream());
System.out.println("fileee "+filename);
ProductDB.fileToString(filename);


} catch (IOException e) {
// TODO Auto-generated catch block
e.printStackTrace();
}
return"success";
}


public String execute() {
return Action.SUCCESS;
}

}

Output should look like this


This section is for insert module of Struts2 with AngularJS and hope you enjoy this tutorial. And if you want source code of this section. Please send me your request then i'll send that on your email id and contact us.
Please feel free to suggest and comment.

Viewing all 322 articles
Browse latest View live