Quantcast
Channel: Geek On Java
Viewing all 322 articles
Browse latest View live

d

$
0
0

Application works in background. Track points are saved at chosen intervals and may be uploaded to dedicated server in real time. This client works with μlogger web server. Together they make a complete self owned and controlled client–server solution.

Features

  • meant to be simple and small (μ);
  • low memory and battery impact;
  • uses GPS or network based location data;
  • synchronizes location with web server in real time, in case of problems keeps retrying;
  • alternatively works in offline mode; positions may be uploaded to the servers manually;
  • configurable tracking settings

Screenshots

api10_main3api10_summaryapi24_settings

Download

Get it on F-Droid

Help

  • μlogger's current status is shown by two leds, one for location tracking and one for web synchronization:
ledtrackingsynchronization
status greenon, recently updatedsynchronized
status yellowon, long time since last updatesynchronization delay
status redoffsynchronization error
  • clicking on current track's name will show track statistics

License

  • GPL, either version 3 or any later

The post d appeared first on Tell Me How - A Place for Technology Geekier.


μlogger – Real time Geo-location Android App

$
0
0

μlogger is a android application for real-time collection and publishing of geolocation data and for continuous logging of location coordinates, designed to record hiking, biking tracks and other outdoor activities.

Application works in background. Track points are saved at chosen intervals and may be uploaded to dedicated server in real time. This client works with μlogger web server. Together they make a complete self owned and controlled client–server solution.

Features

  • meant to be simple and small (μ);
  • low memory and battery impact;
  • uses GPS or network based location data;
  • synchronizes location with web server in real time, in case of problems keeps retrying;
  • alternatively works in offline mode; positions may be uploaded to the servers manually;
  • configurable tracking settings

Screenshots

api10_main3api10_summaryapi24_settings

Help

  • μlogger’s current status is shown by two leds, one for location tracking and one for web synchronization:
ledtrackingsynchronization
status greenon, recently updatedsynchronized
status yellowon, long time since last updatesynchronization delay
status redoffsynchronization error
  • clicking on current track’s name will show track statistics


The post μlogger – Real time Geo-location Android App appeared first on Tell Me How - A Place for Technology Geekier.

μlogger – Real time Geo-location PHP Server

$
0
0

μlogger is a web viewer for tracks uploaded with μlogger mobile client and a web application for real-time collection of geolocation data, tracks viewing and management. Together with a dedicated μlogger mobile client it may be used as a complete self hosted server–client solution for logging and monitoring users’ geolocation.

Live demo:

Requirements:

  • PHP 5.5
  • MYSQL 4.1
  • browser with javascript enabled, cookies for authentication and saving preferences

Features:

  • simple
  • allows live tracking
  • track statistics
  • altitudes graph
  • multiple users
  • user authentication
  • Google Maps API v3
  • OpenLayers v2 (OpenStreet and other layers)
  • ajax
  • user preferences stored in cookies
  • simple admin menu

Todo

  • install script
  • custom icons
  • improve admin menu
  • track editing
  • track display filters (accurracy, provider)

The post μlogger – Real time Geo-location PHP Server appeared first on Tell Me How - A Place for Technology Geekier.

OpenStreetMap surveyor Android app

$
0
0

An Android app which finds wrong, incomplete or extendable data in the user’s vicinity and provides him the tools to complete these easily and directly on site without having to use another editor.

The found issues are presented to the user as markers on a map (like i.e. in Mapdust) that each are solvable by filling out a simple form to complete/correct the information on site. The user’s answer is then processed and directly uploaded into the OSM database in atomic commits in the name of the user’s OSM account. Since the app is meant to be used on a survey, it can be used offline and otherwise aims to be economic with data usage.

The app is aimed at users who do not know anything about OSM tagging schemes but still want to contribute to the OpenStreetMap by surveying their neighbourhood (or other places as well). Because of the target group, only those quests are shown which are answerable very clearly by asking one simple question and only those quests are created which contain very few false positives.

Screenshots

The post OpenStreetMap surveyor Android app appeared first on Tell Me How - A Place for Technology Geekier.

OpenLauncher – Make Launcher in Android

$
0
0

This an open source Android launcher project, started from scratch. We aim to create a powerful and community driven Android launcher.

Grab the APKs here to test it and you can also help by reporting bugs.

FeaturesSupported
Paged desktopYes
DockYes
Scrollable dockNo
Double tab to sleepYes
DockYes
Scrollable backgroundYes
Drag n dropYes
Paged app drawerYes
Vertical app drawerYes
Hide appsYes
Search barYes
Iocn packsYes
WidgetYes
GestureYes


There are three module

  • launcher – The launcher code
  • materialpreffragment – simple lib for custom settings page
  • smoothviewpager – A modified version of original ViewPager

launcher

The structure goes like this

  • activity
  • Home
  • MinBarEditActivity
  • SettingsActivity
  • util (Folder)
  • AppManager
  • AppUpdateReceiver
  • DragAction
  • DragNavigationControl
  • GoodDragShadowBuilder
  • GroupIconDrawable
  • IconListAdapter
  • LauncherAction
  • LauncherSettings
  • Tools
  • WidgetHost
  • widget (Folder)
  • AppDrawer
  • CellContainer
  • Desktop
  • Dock
  • DragOptionView
  • GroupPopupView
  • PageIndicator
  • WidgetView

materialpreffragment

A simple lib extracted from one of my old project, to enable a custom and easy to use settings fragment.

smoothviewpager

A modified version of original ViewPager in order to achieve the smooth scrolling of the ViewPager. Even if the user has scrolled a lot in the vertical axis, scrolling is still enable.

Todo list

Desktop clock customization

More action for the mini bar (later to support expanable mini bar)

Code refactoring

Support landscape orientation

Add more customization settings

Screenshots

The post OpenLauncher – Make Launcher in Android appeared first on Tell Me How - A Place for Technology Geekier.

Make Android RSS reader app

$
0
0

This is a no-nonsense RSS/Atom feed reader app for Android.

One of its primary features is that it parses HTML it finds in feeds and displays it as regular text. No ridiculous web-views here. But still, images are rendered in-line and links are clickable for example.

Quick install

Clone the project:

git clone --recursive http://ift.tt/2obQ4aZ

Then build and install the app to your phone which is connected via USB:

./gradlew installDebug

More details

This is a no-nonsense RSS/Atom feed reader app for Android.

Features:

  • Parses HTML into text
  • Offline reading
  • Local storage
  • Background synchronization
  • Notification support
  • OPML Import/Export
  • Gives access to enclosure links
  • Material design

Screenshots

The post Make Android RSS reader app appeared first on Tell Me How - A Place for Technology Geekier.

Bubble Tab Animation Library Android

Control Camera using CameraFragment Android Library


Android 7.0 Nougat Update got in Moto G4 Plus

$
0
0

Just six months past, Lenovo has unleash an announcement that they’d be bringing the android 7.0 nougat update for the Moto G4 series, along with some other devices. A few of weeks past, the team started the process that brings the update to the us devices. They began with a reportedly “soak test” created on Republic Wireless, so they created the update offered just for a particular range of devices. during this method, they’ll be able to see the real-world performance.

Moto G4 plus to receive the Android 7.0 Nougat update

The full rollout is on its thanks to reach the Moto G4 plus devices within the us. According to a report created by android Central, whoever owns such a model (with the number XT1644) began to receive the OTA (over-the-air) update. However, the update is offered just for people who own an unbarred G4 plus.

The file is around 741 MB massive, and possibly it comes together with performance enhancements and bug fixes, besides transfer the android 7.0 nougat OS in itself. it’s unclear for currently whether the update can bring the latest android security patch discharged in March or not.

Features comes with this update for

Back in october, the Indian branch of Lenovo had created public an especially detailed changelog that showed what’s going to be included in the Moto G4 and G4 plus devices update. According to the report, the update brings a fast switch feature between the apps, so as to help with multitasking. Moreover, the developers bring a multi-window view, thus you’ll be able to see two apps at identical time, side by side. Android nougat additionally brings a new work mode, that enables you to turn the work apps and notifications on and off. This can be significantly helpful in separating your work from your personal life on the device and not only.

The post Android 7.0 Nougat Update got in Moto G4 Plus appeared first on Tell Me How - A Place for Technology Geekier.

Add App Target For New User Using TapTargetView Android Library

FingerprintManager – Handle Android fingerprint API

$
0
0

After Fingerprint security comes in Android many developers want to use that feature in their app but handle android fingerprint API is a hard task but this library offers an easy way to handle authorisation and encryption tasks using Android Fingerprint APIs.

Handle Android fingerprint API

This library can be used to provide basic authentication through fingerprint API, using manual password as backup option. It also allows you to encrypt messages using fingerprint APIs. This library provides a sample to show how it can be used.

Basic use:

You import via gradle from https://jitpack.io add in it to your repositories


allprojects {
repositories {
...
maven { url 'https://jitpack.io' }
}
}

and then adding the library as dependency:


dependencies {
compile 'com.github.JesusM:FingerprintManager:v1.0'
}

Create the fingerprint manager.


fingerPrintManager = new JFingerprintManager(context, key);

key is the name for the symmetric key that is created in the Android Key Store. JFingerprintManager.InitialisationCallback contains a set of method that are called whether the fingerprint is ready to be used or when there is any error (like no fingerprint has been enrolled yet, or if there has been a problem initialising it).

Once the library is ready to be used, it provides two features: authentication and encryption.

Authentication

Authentication provides the simplest way to authenticate a user. Once it uses its fingerprint scanner, you’ll obtain enough information to allow any operation that requires a user authentication. The library API is pretty simple, just call startAuthentication method passing to it a callback that will let you know the result of the operation. If the authentication went ok, you’ll obtain a CryptoObject object that will let you use for authentication operations (see encryption below to see what you can do with that data)

Logic to authenticate using fingerprint:


fingerPrintManager.startAuthentication(new JFingerprintManager.AuthenticationCallback() {
@Override
public void onAuthenticationSuccess(@NonNull FingerprintManagerCompat.CryptoObject cryptoObject) {
// Logic when authentication has been successful
}

@Override
public void onSuccessWithManualPassword(@NonNull String password) {
// Logic when authentication has been successful writting password manually
}

@Override
public void onFingerprintNotRecognized() {
// Logic when fingerprint is not recognised
}

@Override
public void onAuthenticationFailedWithHelp(String help) {
// Logic when authentication has failed
}

@Override
public void onFingerprintNotAvailable() {
// Logic when fingerprint is not available
}
}, getSupportFragmentManager());

Encryption

Authentication will be don only using fingerprint APIs, so if fingerprint is not present or suitable, it will fail.

Logic to encrypt an String message using the library:


fingerPrintManager.encrypt(messageToBeEncrypted, new JFingerprintManager.EncryptCallback() {
@Override
public void onFingerprintNotRecognized() {
// Logic when fingerprint was not recognized not available
}

@Override
public void onAuthenticationFailedWithHelp(String help) {
// Logic when encryption failed with a message
}

@Override
public void onFingerprintNotAvailable() {
// Logic when fingerprint is not available
}

@Override
public void onEncryptionSuccess(String messageEncrypted) {
// Logic to handle the encrypted message
}

@Override
public void onEncryptionFailed() {
// Logic to handle encryption failed
}
}, getSupportFragmentManager());

Customisation:

The library allows you to customise how the visual component is displayed. In order to do that, you can follow these steps:

1.- Declare a xml them like this:


<style name ="DialogThemeLight" parent="Theme.AppCompat.Light.Dialog.MinWidth">
<item name="colorAccent">@color/dialog_light_theme_accent</item>
<item name="android:colorAccent">@color/dialog_light_theme_accent</item>
<item name="android:background">@color/dialog_light_theme_background</item>
<item name="android:textColorPrimary">@color/dialog_light_theme_text_color_primary</item>
<item name="android:textColorSecondary">@color/dialog_light_theme_text_color_secondary</item>
</style>

2.- Once you have the theme, the library provides a method to set it:


fingerPrintManager.setAuthenticationDialogStyle(theme);

In the screenshots section you can see some samples of the customisations.

Authentication using fingerprint and manual password using a light theme.

handle Android fingerprint API

handle Android fingerprint API

Same screens but this time using a dark theme.

handle Android fingerprint API

handle Android fingerprint API

Resources

Hope your like this post please comment your valuable thoughts.

The post FingerprintManager – Handle Android fingerprint API appeared first on Tell Me How - A Place for Technology Geekier.

SlidingRootNav – DrawerLayout-like ViewGroup Android Library

$
0
0

Sometime we need to show ViewGroup content with DrawerLayout and very complicated to implement but this library is a DrawerLayout-like ViewGroup, where a “drawer” is hidden under the content view, which can be shifted to make the drawer visible. It doesn’t provide you with a drawer builder.

Gradle

Add this into your dependencies block.


compile 'com.yarolegovich:sliding-root-nav:1.0.2'

Usage:

  1. Create your content_view.xml (example) or construct a View programatically.
  2. Set the content view (for example, using setContentView in your activity).
  3. Create your menu.xml (example) or construct a View programatically.
  4. Now you need to inject the menu in your onCreate. You can specify transformations of a content view or use the default ones.

new SlidingRootNavBuilder(this)
.withMenuLayout(R.layout.menu_left_drawer)
.inject();

API

Transformations

You can specify root transformations using SlidingRootNavBuilder.


new SlidingRootNavBuilder(this)
.withDragDistance(140) //Horizontal translation of a view. Default == 180dp
.withRootViewScale(0.7f) //Content view's scale will be interpolated between 1f and 0.7f. Default == 0.65f;
.withRootViewElevation(10) //Content view's elevation will be interpolated between 0 and 10dp. Default == 8.
.withRootViewYTranslation(4) //Content view's translationY will be interpolated between 0 and 4. Default == 0
.addRootTransformation(customTransformation)
.inject();

customTransformation in the above example is a user-created class that implements RootTransformation interface.

Menu behavior


new SlidingRootNavBuilder(this)
.withMenuOpened(true) //Initial menu opened/closed state. Default == false
.withMenuLocked(false) //If true, a user can't open or close the menu. Default == false.
.withGravity(SlideGravity.LEFT) //If LEFT you can swipe a menu from left to right, if RIGHT - the direction is opposite.
.withSavedState(savedInstanceState) //If you call the method, layout will restore its opened/closed state
.inject();

Controling the layout

A call to inject() returns you an interface for controlling the layout.


public interface SlidingRootNav {
boolean isMenuHidden();
boolean isMenuLocked();
void closeMenu();
void closeMenu(boolean animated);
void openMenu();
void openMenu(boolean animated);
void setMenuLocked(boolean locked);
SlidingRootNavLayout getLayout(); //If for some reason you need to work directly with layout - you can
}

Callbacks

  • Drag progress:

builder.addDragListener(listener);

public interface DragListener {
void onDrag(float progress); //Float between 0 and 1, where 1 is a fully visible menu
}
  • Drag state changes:

builder.addDragStateListener(listener);

public interface DragStateListener {
void onDragStart();
void onDragEnd(boolean isMenuOpened);
}
  • Compatibility with DrawerLayout.DrawerListener:

DrawerListenerAdapter adapter = new DrawerListenerAdapter(yourDrawerListener, viewToPassAsDrawer);
builder.addDragListener(listenerAdapter).addDragStateListener(listenerAdapter);

Hope you like this tutorial please comment below.

The post SlidingRootNav – DrawerLayout-like ViewGroup Android Library appeared first on Tell Me How - A Place for Technology Geekier.

j2HTML – Java HTML5 generation Library

$
0
0

If you’re a Java lover and want to make UI interface in java instead of using HTML5. Then j2HTML is a java library of Java to HTML generator. You can enjoy typesafe HTML generation.

How to add j2html in project

Add the maven dependency


<dependency>
<groupId>com.j2html</groupId>
<artifactId>j2html</artifactId>
<version>0.88</version>
</dependency>

Import TagCreator and start building HTML


import static j2html.TagCreator.*;

public class Main {
public static void main(String[] args) {
body().with(
h1("Heading!").withClass("example"),
img().withSrc("img/hello.png")
).render();
}
}

The above Java will result in the following HTML:


<body>
<h1 class="example">Heading!</h1>
<img src="img/hello.png">
</body>

Basic example

Creating a basic webpage in j2html is pretty similar to HTML. This Java code:


html().with(
head().with(
title("Title"),
link().withRel("stylesheet").withHref("/css/main.css")
),
body().with(
main().with(
h1("Heading!")
)
)
)

Becomes this HTML:


<html>
<head>
<title>Title</title>
<link rel="stylesheet" href="/css/main.css">
</head>
<body>
<main>
<h1>Heading!</h1>
</main>
</body>
<html>

It’s literally impossible to forget to close a div, mistype an attribute name, or forget an attribute quote! Remember to include the Java wrapping code though, j2html is not a template language, all files are .java.

Partials

You can create partials for elements you use a lot:


public static Tag enterPasswordInput(String placeholder) {
return passwordInput("enterPassword", placeholder);
}

public static Tag choosePasswordInput(String placeholder) {
return passwordInput("choosePassword", placeholder);
}

public static Tag repeatPasswordInput(String placeholder) {
return passwordInput("repeatPassword", placeholder);
}

public static Tag passwordInput(String identifier, String placeholder) {
return input()
.withType("password")
.withId(identifier)
.withName(identifier)
.withPlaceholder(placeholder)
.isRequired();
}

public static Tag emailInput(String placeholder) {
return input()
.withType("email")
.withId("email")
.withName("email")
.withPlaceholder(placeholder)
.isRequired();
}

public static Tag submitButton(String text) {
return button().withType("submit").withText(text);
}

The equivalent HTML would be:


<input
type="password"
id="enterPassword"
name="enterPassword"
placeholder="Enter password"
required
>

<input
type="password"
id="choosePassword"
name="choosePassword"
placeholder="Choose password"
required
>

<input
type="password"
id="repeatPassword"
name="repeatPassword"
placeholder="Repeat password"
required
>

<input
type="email"
id="email"
name="email"
placeholder="Email"
required
>

<button type="submit">Text</button>

For more example you can see above given button.

Hope you like this tutorial please comment below your thoughts.

The post j2HTML – Java HTML5 generation Library appeared first on Tell Me How - A Place for Technology Geekier.

Make Videocon Television Your All Time Friend For Utmost Entertainment

$
0
0
Today the total concept of television has been changed due to the development of technology. Television is jeeringly termed as the bulky box, but that outlook is changed today.To enhance the beauty of the living room, Television companies have introduced and brought slim and smart television in the market. Technology has made it easy to get fine video quality and fine image in the smart televisions. While sitting cosily in the drawing-room, and witness the events of the world or the favourite serials or movies, the customers would like to witness the best quality picture rather lively pictures in their television set. Customers can experience a new type of television viewing which is uninterrupted and unparalleled and alive.


Make Videocon Television Your All Time Friend For Utmost Entertainment

What facilities you can get on Videocon Smart Television? 

Videocon Smart Television Price In India can complete the customers’ all demands as you can get all the latest features in it. Videocon has brought smart television with different facilities in it like surfing different web pages, watching anything on a big screen, 3D pictures, streaming content from online gaming, can download any apps and can get the access into it directly from the television. Videocon has offered the innovative choice of ‘Smart Share’ and ‘Smart Browser’ that can help you to sort-out any type of files easily. The customers can sync in all their gadgets with their smart television so that they can work efficiently. The most promising matter is it has less consumption of energy with high quality pictures.

Some tips you should keep in mind when you are purchasing a Television

As such there are different companies that have brought almost same type of smart television in the market but when you are buying the smart television, you should keep in mind certain factors and these are the technical requirement, connectivity of the television, and definitely the price of the high-end models. Videocon Television Price In India can fulfill your requirements.


Create Custom Android Toast Using TastyToast Library

$
0
0

We all use Android Toast in our application and definitely bored with native Android Toast. You can see many way to create custom Toast for your Android application. But today i am showing you a great Android Library which helps an user to get rid of their native Android Toast.

TastyToast helps the user by characterising the type of Toast into five main category which are success, danger, warning, info and default.

  • For each default category, it not only changes background and text colour but also adds tasty Custom View on the left side of Toast.

The library provides flexibility to customize text color, background of Toast and has specific toast icon for each category.

Recommended article:

How to create custom Android Toast using TastyToast

It very easy to use lets show first demo then we dive with code:

Preview

Demo success - TastyToast Android Custom Toast LibraryDemo warning - TastyToast Android Custom Toast Library


Demo error - TastyToast Android Custom Toast LibraryDemo info - TastyToast Android Custom Toast LibraryDemo default - TastyToast Android Custom Toast LibraryDemo confusion - TastyToast Android Custom Toast Library


Dependency

Add dependency in your app module


dependencies { compile 'com.sdsmdg.tastytoast:tastytoast:0.1.1' }

Usage

Java


TastyToast.makeText(getApplicationContext(), "Hello World !", TastyToast.LENGTH_LONG, TastyToast.WARNING);

Last parameter here is the type of toast you want to show.

Thats it how easy it is. Isn’t it ? Please tell us in comment with your thoughts.

The post Create Custom Android Toast Using TastyToast Library appeared first on Tell Me How - A Place for Technology Geekier.


Make dynamic Android View using json2view library

$
0
0

In most of Android application we need to make dynamic Android view as per requirement that’s why i come with json2view library which is a simple library that can convert a compatible JSON file to an Android view so you can load dynamically the view in your Android app without the need to update the APK.

This removes the hassle of updating, re-compiling and uploading the APK to Google Play every-time you want to make small or big changes in the UI.

How it works

You can parse any xml through the json2view library to create a JSON that will be used at runtime to dynamically generate the Android UI using native code. This JSON can be hosted anywhere on the internet (your own server, Dropbox, Github Pages etc.) and can be fetched in your app at any point you decide.

how it works schematic

Note: Runtime creation of a view without the precompiled version of xml in apk (res/layout), especially for highly complex layouts, can be a potential latency issue.

Installation

  • Download project
  • add json2view in your project by adding in your settings.gradle

include ':json2view'
project(':json2view'*).projectDir = new File(settingsDir, '$(json2viewPath)/json2view/json2view')
  • add in build.gradle of application module (not project build.gradle) in dependencies section

compile project(':json2view')

Getting started

Basic JSON format

The input JSON has 3 fields for every view we want to create :

  • widget : canonicalName of View (for views in package android.widget you can ommit android.widget)
  • properties : list of properties for the view. (Available Properties) By default we add layout_width& layout_height with value `wrap_content’
  • views : children views for ViewGroup (optional)

eg. JSON to create a empty TextView


{
"widget": "android.widgetTextView",
"properties": []
}

eg. JSON to create a TextView with textSize : 12sp and text : “Hello TellMeHow!”


{
"widget": "TextView",
"properties": [
{"name":"textSize", "type": "dimen", "value":"13sp"},
{"name":"text", "type": "string", "value":"Hello TellMeHow!"}
]
}

You can use ConvertXML2JSON.groovy (from ./utils) to convert any android xml to json2view valid JSON file (the script needs further development to create a valid JSON for every case)
try :


./gradlew runScript -Pxml=./pathToInputXmlFile.xml

from the root folder of the project

Loading dynamic layout

create and attach view in the specific Parent (created from xml)


ViewParent viewParent = (ViewParent) findViewById(R.id.parent_view_id)
JSONObject jsonObject = ... // load from network, sdcard etc
View sampleView = DynamicView.createView(this, jsonObject, viewParent);


The post Make dynamic Android View using json2view library appeared first on Tell Me How - A Place for Technology Geekier.

json2view : How to change Android layout dynamically

$
0
0

In previous article we discuss about installation of json2view library and how to change properties of Android ui dynamically but today we discuss about how to change Android layout dynamically with help of json2view library.

You can check installation and implementation of json2view Android library.

Let come with example of json2view Android library and in this tutorial we studying how to dynamically change Android layout using json2view library.

Xml 2 JSON Examples

output

Using json2view to reorganize the layout of a screen

before


<?xml version="1.0" encoding="utf-8"?>
<LinearLayout xmlns:android="http://ift.tt/nIICcg"
android:layout_width="match_parent"
android:layout_height="match_parent"
android:orientation="vertical">

<Button
android:layout_width="wrap_content"
android:layout_height="wrap_content"
android:layout_gravity="center"
android:layout_margin="10dp"
android:minWidth="250dp"
android:text="menu 01" />

<Button
android:layout_width="wrap_content"
android:layout_height="wrap_content"
android:layout_gravity="center"
android:layout_margin="10dp"
android:minWidth="250dp"
android:text="menu 02" />

<Button
android:layout_width="wrap_content"
android:layout_height="wrap_content"
android:layout_gravity="center"
android:layout_margin="10dp"
android:minWidth="250dp"
android:text="menu 03" />

<Button
android:layout_width="wrap_content"
android:layout_height="wrap_content"
android:layout_gravity="center"
android:layout_margin="10dp"
android:minWidth="250dp"
android:text="menu 04" />

</LinearLayout>

{
"views": [{
"views": [],
"properties": [{
"value": "wrap_content",
"type": "dimen",
"name": "layout_width"
},
{
"value": "wrap_content",
"type": "dimen",
"name": "layout_height"
},
{
"value": "center",
"type": "string",
"name": "layout_gravity"
},
{
"value": "10dp",
"type": "dimen",
"name": "layout_margin"
},
{
"value": "250dp",
"type": "dimen",
"name": "minWidth"
},
{
"value": "menu 01",
"type": "string",
"name": "text"
}],
"widget": "Button"
},
{
"views": [],
"properties": [{
"value": "wrap_content",
"type": "dimen",
"name": "layout_width"
},
{
"value": "wrap_content",
"type": "dimen",
"name": "layout_height"
},
{
"value": "center",
"type": "string",
"name": "layout_gravity"
},
{
"value": "10dp",
"type": "dimen",
"name": "layout_margin"
},
{
"value": "250dp",
"type": "dimen",
"name": "minWidth"
},
{
"value": "menu 02",
"type": "string",
"name": "text"
}],
"widget": "Button"
},
{
"views": [],
"properties": [{
"value": "wrap_content",
"type": "dimen",
"name": "layout_width"
},
{
"value": "wrap_content",
"type": "dimen",
"name": "layout_height"
},
{
"value": "center",
"type": "string",
"name": "layout_gravity"
},
{
"value": "10dp",
"type": "dimen",
"name": "layout_margin"
},
{
"value": "250dp",
"type": "dimen",
"name": "minWidth"
},
{
"value": "menu 03",
"type": "string",
"name": "text"
}],
"widget": "Button"
},
{
"views": [],
"properties": [{
"value": "wrap_content",
"type": "dimen",
"name": "layout_width"
},
{
"value": "wrap_content",
"type": "dimen",
"name": "layout_height"
},
{
"value": "center",
"type": "string",
"name": "layout_gravity"
},
{
"value": "10dp",
"type": "dimen",
"name": "layout_margin"
},
{
"value": "250dp",
"type": "dimen",
"name": "minWidth"
},
{
"value": "menu 04",
"type": "string",
"name": "text"
}],
"widget": "Button"
}],
"properties": [{
"value": "match_parent",
"type": "dimen",
"name": "layout_width"
},
{
"value": "match_parent",
"type": "dimen",
"name": "layout_height"
},
{
"value": "vertical",
"type": "string",
"name": "orientation"
}],
"widget": "LinearLayout"
}

after


<?xml version="1.0" encoding="utf-8"?>
<LinearLayout xmlns:android="http://ift.tt/nIICcg"
android:layout_width="match_parent"
android:layout_height="match_parent"
android:orientation="vertical">

<LinearLayout
android:layout_width="match_parent"
android:layout_height="0dp"
android:layout_weight="0.5"
android:orientation="horizontal">

<Button
android:layout_width="0dp"
android:layout_height="match_parent"
android:layout_margin="10dp"
android:layout_weight="0.5"
android:text="menu 01" />

<Button
android:layout_width="0dp"
android:layout_height="match_parent"
android:layout_margin="10dp"
android:layout_weight="0.5"
android:text="menu 02" />

</LinearLayout>

<LinearLayout
android:layout_width="match_parent"
android:layout_height="0dp"
android:layout_weight="0.5"
android:orientation="horizontal">

<Button
android:layout_width="0dp"
android:layout_height="match_parent"
android:layout_margin="10dp"
android:layout_weight="0.5"
android:text="menu 03" />

<Button
android:layout_width="0dp"
android:layout_height="match_parent"
android:layout_margin="10dp"
android:layout_weight="0.5"
android:text="menu 04" />
</LinearLayout>

</LinearLayout>

{
"views": [{
"views": [{
"views": [],
"properties": [{
"value": "0dp",
"type": "dimen",
"name": "layout_width"
},
{
"value": "match_parent",
"type": "dimen",
"name": "layout_height"
},
{
"value": "10dp",
"type": "dimen",
"name": "layout_margin"
},
{
"value": "0.5",
"type": "float",
"name": "layout_weight"
},
{
"value": "menu 01",
"type": "string",
"name": "text"
}],
"widget": "Button"
},
{
"views": [],
"properties": [{
"value": "0dp",
"type": "dimen",
"name": "layout_width"
},
{
"value": "match_parent",
"type": "dimen",
"name": "layout_height"
},
{
"value": "10dp",
"type": "dimen",
"name": "layout_margin"
},
{
"value": "0.5",
"type": "float",
"name": "layout_weight"
},
{
"value": "menu 02",
"type": "string",
"name": "text"
}],
"widget": "Button"
}],
"properties": [{
"value": "match_parent",
"type": "dimen",
"name": "layout_width"
},
{
"value": "0dp",
"type": "dimen",
"name": "layout_height"
},
{
"value": "0.5",
"type": "float",
"name": "layout_weight"
},
{
"value": "horizontal",
"type": "string",
"name": "orientation"
}],
"widget": "LinearLayout"
},
{
"views": [{
"views": [],
"properties": [{
"value": "0dp",
"type": "dimen",
"name": "layout_width"
},
{
"value": "match_parent",
"type": "dimen",
"name": "layout_height"
},
{
"value": "10dp",
"type": "dimen",
"name": "layout_margin"
},
{
"value": "0.5",
"type": "float",
"name": "layout_weight"
},
{
"value": "menu 03",
"type": "string",
"name": "text"
}],
"widget": "Button"
},
{
"views": [],
"properties": [{
"value": "0dp",
"type": "dimen",
"name": "layout_width"
},
{
"value": "match_parent",
"type": "dimen",
"name": "layout_height"
},
{
"value": "10dp",
"type": "dimen",
"name": "layout_margin"
},
{
"value": "0.5",
"type": "float",
"name": "layout_weight"
},
{
"value": "menu 04",
"type": "string",
"name": "text"
}],
"widget": "Button"
}],
"properties": [{
"value": "match_parent",
"type": "dimen",
"name": "layout_width"
},
{
"value": "0dp",
"type": "dimen",
"name": "layout_height"
},
{
"value": "0.5",
"type": "float",
"name": "layout_weight"
},
{
"value": "horizontal",
"type": "string",
"name": "orientation"
}],
"widget": "LinearLayout"
}],
"properties": [{
"value": "match_parent",
"type": "dimen",
"name": "layout_width"
},
{
"value": "match_parent",
"type": "dimen",
"name": "layout_height"
},
{
"value": "vertical",
"type": "string",
"name": "orientation"
}],
"widget": "LinearLayout"
}

Hope you like this tutorial and if you’ve any problem then comment box is for you.

The post json2view : How to change Android layout dynamically appeared first on Tell Me How - A Place for Technology Geekier.

json2view : Create dynamic Android layouts

$
0
0

In previous article we discuss about changes Android layout dynamically and here we discuss some more examples about How we can make dynamic Android layouts using json2view library.

You can check installation and implementation of json2view Android library.

  • Create and attach view in the specific Parent (created from xml)

/* load xml layout */
setContentView(R.layout.main);
ViewParent viewParent = (ViewParent) findViewById(R.id.parent_view_id)
JSONObject jsonObject = ... // load from network, sdcard etc
View sampleView = DynamicView.createView(this, jsonObject, viewParent);
  • Create and attach view in the activity

JSONObject jsonObject = ... // load from network, sdcard etc
View sampleView = DynamicView.createView(this, jsonObject);
sampleView.setLayoutParams(
new WindowManager.LayoutParams(
WindowManager.LayoutParams.MATCH_PARENT,
WindowManager.LayoutParams.MATCH_PARENT));
setContentView(sampleView);
  • Create a view and get reference to specific children in the view tree

static public class SampleViewHolder {
/* we need the View with id testClick */
@DynamicViewId(id = "testClick")
public View clickableView;

/* Constructor must be public */
public SampleViewHolder() {}
}

...

@Override
protected void onCreate(Bundle savedInstanceState) {
/* load xml layout */
setContentView(R.layout.main);
ViewParent viewParent = (ViewParent) findViewById(R.id.parent_view_id)
JSONObject jsonObject = ... // load from network, sdcard etc
/* attach the view from the json in parent and add a tag in sampleView. */
View sampleView =
DynamicView.createView(this, jsonObject, viewParent, SampleViewHolder.class);
/*
The tag's class is SampleViewHolder.
The variables that Annotated @DynamicViewId will be the reference,
to the actual view created, with id (that is the argument of the annotation).
In this example the json contains a view with id "testClick"
and the View return in clickableView
*/
((SampleViewHolder) sampleView.getTag())
.clickableView.setOnClickListener( /* attach to click listener */ );

}

Hope you like this tutorial and if you’ve any problem then comment box is for you.

The post json2view : Create dynamic Android layouts appeared first on Tell Me How - A Place for Technology Geekier.

json2view : Some important properties and types

$
0
0

In our all previous article we see implementation and their some example of json2view android library.

But here we see some important properties and types of json2view library which you can use in your applications.

Any View

NameTypeExample
layout_widthdimen{"name":"layout_width", "type":"dimen", "value":"match_parent"}
{"name":"layout_width", "type":"dimen", "value":"250dp"}
{"name":"layout_width", "type":"dimen", "value":"90%"}
layout_heightdimen{"name":"layout_width", "type":"dimen", "value":"50dp"}
idref{"name":"id", "type":"ref", "value":"closeBtn"}
padding_left
padding_right
padding_top
padding_bottom
padding
dimen{"name":"padding", "type":"dimen", "value":"8dp"}
layout_marginLeft
layout_marginRight
layout_marginTop
layout_marginBottom
layout_margin
dimen{"name":"layout_margin", "type":"dimen", "value":"16dp"}
backgroundcolor{"name":"background", "type":"color", "value":"#00FF00"}
ref{"name":"background", "type":"ref", "value":"drawable_name_in_res_folder"}
base64{"name":"background", "type":"base64", "value":"BASE64_ENCODE_OF_PNG_IMAGE"}
drawable“`{“name”:”background”, “type”:”drawable”, “value”: {“CORNER”: “10dp
enabledboolean{"name":"enabled", "type":"boolean", "value":"true"}
selectedboolean{"name":"selected", "type":"boolean", "value":"t"}
clickableboolean{"name":"clickable", "type":"boolean", "value":"0"}

Text View

NameTypeExample
textstring{"name":"id", "type":"string", "value":"Hello World!"}
textref{"name":"id", "type":"ref", "value":"string_id_from_res_string.xml"}
textColorcolor{"name":"textColor", "type":"color", "value":"0xFF00FF00"}
textSizedimen{"name":"textSize", "type":"textSize", "value":"13sp"}
textStyleinteger{"name":"textStyle", "type":"integer", "value":"1"}
Value are Constants in Typeface
  • 0: normal
  • 1: bold
  • 2: italics
  • 3: bold+italics
ellipsizestring{"name":"ellipsize", "type":"string", "value":"MIDDLE"}
Enum Value from TextUtils.TruncateAt
maxLinesinteger{"name":"maxLines", "type":"integer", "value":"3"}
gravityinteger{"name":"gravity", "type":"integer", "value":"16"}
Values from Gravity eg 16 for CENTER_VERTICAL
string{"name":"gravity", "type":"string", "value":"CENTER_VERTICAL"}
Constants name from Gravity
drawableTop
drawableBottom
drawableLeft
drawableRight
dimen{"name":"drawableTop", "type":"base64", "value":"Base64EncodedImage"}

Image View

NameTypeExample
srcref{"name":"src", "type":"ref", "value":"drawadle_name_from_res"}
base64{"name":"src", "type":"base64", "value":"Base64EncodedImage"}
scaletypestring{"name":"scaletype", "type":"string", "value":"CENTER_CROP"}
Enum Value from ImageView.ScaleType
adjustviewboundsboolean{"name":"adjustviewbounds", "type":"boolean", "value":"f"}

ViewGroup (LinearLayout / RelativeLayout)

NameTypeExample
layout_above
layout_alignBaseline
layout_alignBottom
layout_alignEnd
layout_alignLeft
layout_alignRight
layout_alignStart
layout_alignTop
layout_below
layout_toEndof
layout_toLeftof
layout_toRightof
layout_toStartof
ref{"name":"layout_below", "type":"ref", "value":"idOfOtherViewInSameReativeLayout"}
layout_alignParentBottom
layout_alignParentEnd
layout_alignParentLeft
layout_alignParentRight
layout_alignParentStart
layout_alignParentTop
layout_alignWithParentIfMissing
layout_centeHorizontal
layout_centerInParent
layout_centerVertical
boolean{"name":"layout_alignParentBottom", "type":"boolean", "value":"true"}
layout_gravityinteger{"name":"layout_gravity", "type":"integer", "value":"16"}
Values from Gravity eg 16 for CENTER_VERTICAL
string{"name":"layout_gravity", "type":"string", "value":"CENTER_VERTICAL"}
Constants name from Gravity
orientationinteger{"name":"orientation", "type":"integer", "value":"0"}
  • 0 : horizontal
  • 1 : vertical
string{"name":"orientation", "type":"string", "value":"HORIZONTAL"}
value : "HORIZONTAL" | "VERTICAL"

Generic (experimental)

NameTypeExample
Functionjson{ "name": "function", "type": "json", "value": { "function":"setMax", "args":[ {"primitive":"Integer" , "value":"10"} ] } }
to call setMax function with argument 10 of the new created View (eg seekBar.setMax(10) if the property belongs to widget “SeekBar”)


Types

Nameused in
stringeg. the text Value of TextView
integermost used in predefined values
(eg Horizontal == 0 for LinearLayout Orientation)
dimen12sp, 13dp, 120 (if only number implies pixels),
90% (0.9 * dimension of device screen width)
base64encoded with base64 image
jsoncustom functionality


Hope you like this tutorial and if you’ve any problem then comment box is for you.

The post json2view : Some important properties and types appeared first on Tell Me How - A Place for Technology Geekier.

MathView Android Layout Library » Tell Me How - A Place for Technology Geekier

$
0
0
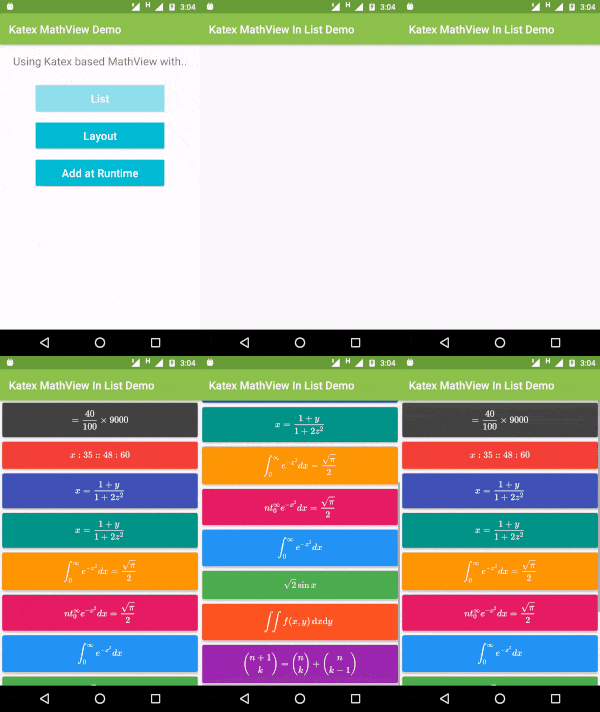
When i was beginner then i want to make an Android app on Math tutorial but i faced a problem to show advance Math formulas. But now if you also want to do same thing then i have a great library named Katext MathView Android Layout Library.
How to add MathView Android Layout Library
It is a KhanAcademy Katex based Library for Rendering math faster in various Android Devices. This a View which is created from extending webview. This view allows you to render latex in your android devices. It can load normal text, text with latex and latex alone. The only thing you have to make sure is your latex should be enclosed inside either $your latex formula$ or $$your latex formula$$. This will also allow you to beautify your formula text by setting color and text size.
Viewing all 322 articles
Browse latest View live